Appendix: ROS 2
Objective: This tutorial session presents a fast introduction to the basic concepts of ROS 2, highlighting the main differences with ROS 1.
Contents
After this session you will be able to:
Describe the basic concepts of ROS 2.
Have ROS 2 installed in your computer.
Create and run simple ROS 2 programs.
Have a view to accelerate the transition to ROS 2.
References:
This tutorial is partially based on:
[1] The talk ROS1 vs ROS2 - Practical Overview for ROS Developers by Edouard Renard from Robotics Back-End.
[2] Chapter 1 and 2 of the book Concise Introduction to Robot Programming With Ros2 by Francisco Martín Rico (examples: https://github.com/fmrico/book_ros2)
[3] ROS 2 Tutorials.
[4] ROS 2 Concepts.
[5] ROS 2 Design.
[5] The paper Robot Operating System 2: Design, architecture, and uses in the wild.
Introduction
Motivation
ROS and its ecosystem has made it easier to build robot systems, but since ROS 1 did not prioritize security, network topology, real-time applications or system up-time, the transition from research to commercial projects did not boost. Those missing features were difficult to be met by modifying ROS 1 and required ROS 2 to be redesigned from the ground changing the standard used for communications.
Further reading
ROS 2 Design - Articles: Why ROS 2?
The ROS 2 Design
ROS 2 has been designed with different layers, shown in the figure (taken from [2]).
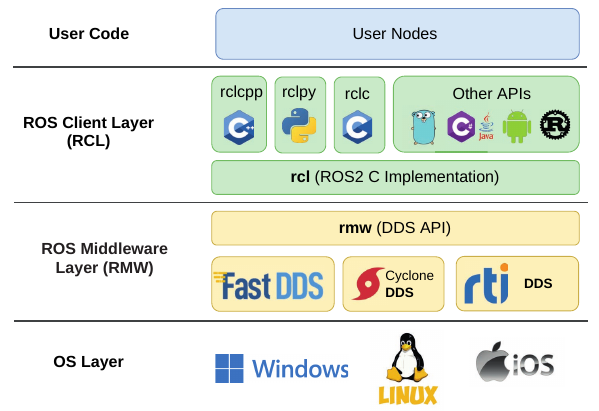
OS Layer: ROS 2 runs on different operating systems (Linux, Windows, Mac).
ROS Middleware Layer (RMW): ROS 2 is based on the Data Distribution Service (DDS), an open standard for communications implemented over UDP. Since different DDS vendors can be used, a DDS API is provided, the ROS Middleware interface (rmw). The adoption of DDS allows the exchange of information between processes with real-time characteristics, security capabilities, and custom quality of service of each connection.
ROS client library (RCL): The basic functionality of all ROS 2 elements are implemented in a single C library called rcl; then the libraries rclcpp and rclpy adapt this functionality to the particularities of each language, C++ and Python, respectively. APIs for other languages can be implemented. This allows new functionalities to be available sooner in any language.
User Code: ROS 2 provides a convention on how to write nodes by forcing implemented nodes to inherit from a Node class that already has all the functionalities required. This saves a lot of time, facilitates a good modular structure and eases the cooperation between projects.
Further reading
Main differences at a glance
ROS 2 main concepts are the same as those in ROS 1, but there are important differences related to communications, the building environment or how the code is written.
The main differences related to communications (detailed in Section Communications in ROS 2) are:
The decentralized architecture (there is no ROS master; there are no global parameters)
Services are synchronous
Actions are part of the ROS 2 core
Messages names include the namespace
Quality of service policies can be defined
The main differences related to the building environment (detailed in Section The environment in ROS 2) are:
The build tool has changes from catkin to colcon
A single command line tool (ros2) is used, with different options (pkg, node, run, launch,…)
There is a reorganization in the package structure, mainly for the Python packages
The new concept of overlays has been introduced, as a stack of workspaces
The main differences when writing code (detailed in Section Coding in ROS 2) are:
A convention to write nodes has been introduced
Many nodes can run in the same executable
Launch files are written in Python, which gives more flexibility
The new feature of Live cycle nodes allow to have nodes in different states (Unconfigured, Inactive, Finalized, Active)
Distributions and installation
The current LTS distribution is Humble Hawksbill (humble) (May 2022); the next distribution will be Iron Irwini (iron) (May 2023).
Follow these Install Instructions to install humble in Ubuntu 22.04.2 LTS (Jammy Jellyfish).
If you cannot change your operating system or do not want to use a virtual machine, you can setup ROS 2 with VSCode and Docker.
Communications in ROS 2
The master
In ROS 1 the ROS master acted as DNS server, i.e. it allowed nodes to retrieve info and communicate. In ROS 2 there is no master! By using the DDS communication middleware protocol, in ROS 2 each node has the capacity to discover any other node, which gives rise to fully distributed systems.
DDS allows to have different logical networks sharing a single physical network by using the Domain ID mechanism. ROS 2 nodes on the same domain can freely discover and send messages to each other, while ROS 2 nodes on different domains cannot. All ROS 2 nodes use domain ID 0 by default. To avoid interference between different groups of computers running ROS 2 on the same network, a different domain ID should be set for each group.
Further reading
ROS 2 Documentation - Concepts: The ROS_DOMAIN_ID
ROS parameters
In ROS 2, since there is no rosmaster, there is no global parameter server. Each parameter is specific to a node, i.e. nodes declare and manage their parameters, which are destroyed when the nodes are killed.
Parameters are used to configure nodes at startup (and during runtime), without changing the code.
When a node is started, some services are created to interact with the parameters. Additionally, the created parameters can be modified by binding a callback to each one, that can be called on the fly to modify their values.
Further reading
Services
As a difference with ROS 1, in ROS 2 services are asynchronous, i.e. the main thread is not stuck, although they can be made synchronous.
An asynchronous client will immediately return future, a value that indicates whether the call and response is finished (not the value of the response itself), after sending a request to a service. The returned future may be queried for a response at any time, e.g. using a timer or callback, a dedicated thread, or by another method. It is up to you, as the caller, to decide how to store future, check on its status, and retrieve your response.
Since sending a request doesn’t block anything, the function spin_until_future_complete allows to loop waiting for future to have a given value:
auto result = client->async_send_request(request);
// Wait for the result.
if (rclcpp::spin_until_future_complete(node, result) ==
  rclcpp::FutureReturnCode::SUCCESS)
{
  ...
} else {
  ...
}
Further reading
Actions
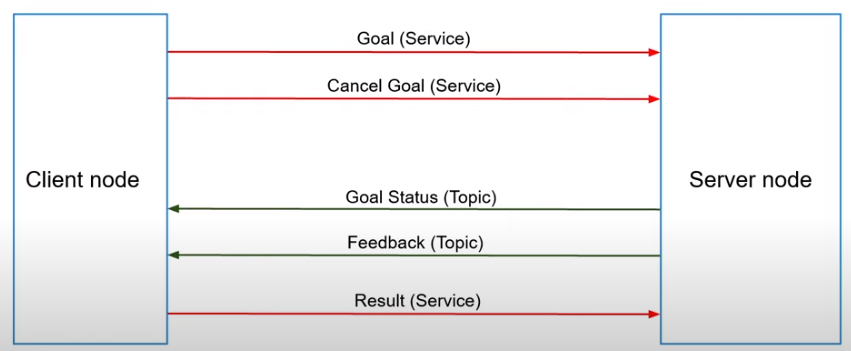
In ROS 1, actions were implemented as a separate library, actionlib, built on top of the client libraries. In ROS 2, however, actions are in the core functionalities, i.e. they are included in the client library implementations (and e.g. they can be called from the command line).
The API for actions is similar to ROS 1, but in ROS 2 they use a combination of topics and services (because services are now asynchronous), as shown in the figure (taken from [1]), i.e.:
Topics are used for getting feedback and goal status.
Services are used for setting the goal, canceling a goal or requesting a result.
Further reading
Interfaces
The way to create interfaces in ROS 2 is similar to ROS 1, i.e. defining .msg, .srv and .action files in msg, srv, and action folders.
In ROS 2, however, once generated, the namespace that identifies the type of interface (msg, srv or action) is added to the message name, e.g. in a package called my_robot_msgs containing the message Temperature and the sevice ActivateButton, once compiled they need to be referred as:
my_robot_msgs/msg/Temperaturemy_robot_msgs/srv/ActivateButton
Further reading
Quality of Service (QoS)
In ROS 2 we can chose how nodes handle information, according to the application and the network, e.g.:
We may want to be sure all messages are received, or
It may be ok to loose some messages as long as the data is frequently updated, or
We want to maintain a queue of messages for the case when the node is not able to handle them all, or
It may be ok to drop any new message that arrives while the callback of the previous one is running.
i.e., ROS 2 allows for data flow configuration by settings message reliability, deadline, and priority, which can ensure that critical messages are delivered on time.
The QoS is set e.g. when defining a publisher, e.g.:
publisher = node->create_publisher<std_msgs::msg::String>("chatter", rclcpp::QoS(100).transient_local().best_effort());
By default ROS 2 has the same behavior as ROS 1, which is:
Any node subscribing to a topic will not receive any message sent before the subscription, and
The messages are guaranteed to be delivered, provided a large enough queue size is set for the messages waiting to be processed by the callback.
And hence the syntax is the same, e.g.:
vel_pub_ = create_publisher<geometry_msgs::msg::Twist>("output_vel", 10);
Further reading
ROS 2 Documentation - Concepts: About Quality of Service Settings.
The environment in ROS 2
The build tool
The ROS 2 build system is called ament and is the responsible to make it easier to develop and maintain ROS 2 core packages, as well as to establish conventions so that developers should be able to pick up any ament based package and make some assumptions about how it works, how to introspect it, and how to build or use it. The ament build system is composed of:
ament_package: Setup tools Python package that follows the ament packaging guidelines.ament_cmake: Repository containing packages that provide the necessary CMake functions/macros and CMake Modules to facilitate the use of CMake to create ament packages, i.e. packages that follows the ament packaging guidelines.ament_lint: Repository providing packages with linting and testing services.
ament_cmake does not support the concept of the devel space and requires the package to be installed.
The CMakeLists.txt files using the ament build system are similar to the ones using catkin, e.g.:
cmake_minimum_required(VERSION 3.5)
project(br2_basics)

find_package(ament_cmake REQUIRED)
find_package(rclcpp REQUIRED)
find_package(std_msgs REQUIRED)

set(dependencies
    rclcpp
    std_msgs
)

add_executable(publisher src/publisher.cpp)
ament_target_dependencies(publisher ${dependencies})

...

install(TARGETS
  publisher
  ...
  logger
  logger_class
  param_reader
  ARCHIVE DESTINATION lib
  LIBRARY DESTINATION lib
  RUNTIME DESTINATION lib/${PROJECT_NAME}
)

install(DIRECTORY launch config DESTINATION share/${PROJECT_NAME})

if(BUILD_TESTING)
  find_package(ament_lint_auto REQUIRED)
  ament_lint_auto_find_test_dependencies()
endif()

ament_export_dependencies(${dependencies})
ament_package()
The ROS 2 build is called colcon and is used to perform the task of building a workspace of packages together at once with a single invocation, i.e. it determines the dependency graph and invokes the specific build system for each package in topological order:
$ colcon build
$ source install/setup.bash
Note: The setup.sh file to be sourced is in the install folder since the devel is not supported in ament.
To only process a specific package or a specific package including all the recursive dependencies it needs:
$ colcon build --packages-select <name-of-pkg>
$ colcon build --packages-up-to <name-of-pkg>
Further reading
Command line tools
In ROS 2 we only have a command line (ros2) with different options (pkg, node, run, launch,…), e.g.:
$ ros2 node list
$ ros2 topic list
$ ros2 node info /talker
$ ros2 service type /clear
$ ros2 interface list
$ ros2 interface show std msgs/msg/String
$ ros2 run turtlesim turtle_teleop_key
Further reading
Packages
ROS2 offers a more complex but more complete and better organized way to create packages.
To create packages in ROS 2 we need to add the argument --build-type to specify if it is in Python or C++ package, since the package architecture changes in each case:
$ ros2 pkg create <package_name> --build-type ament_cmake
$ ros2 pkg create <package_name> --build-type ament_python
The architecture of Python packages has changed but that of C++ packages is similar to ROS 1:
CMakeLists.txt file that describes how to build the code within the package
include/<package_name> directory containing the public headers for the package
package.xml file containing meta information about the package
src directory containing the source code for the package
A simple workspace could be:
workspace_folder/
   src/
     cpp_package_1/
         CMakeLists.txt
         include/cpp_package_1/
         package.xml
         src/

     py_package_1/
         package.xml
         resource/py_package_1
         setup.cfg
         setup.py
         py_package_1/
     ...
     cpp_package_n/
         CMakeLists.txt
         include/cpp_package_n/
         package.xml
         src/
Further reading
Overlays
ROS 2 introduces the concept of overlays, which allows to work with a stack of workspaces.
There can be different packages in the overlays (even an overlay can be created for just one package), and if a package is in several overlays, the one in the higher level is used as shown in the figure that compares ROS 1 vs. ROS 2 (taken from [1]). With this infrastructure we can, for instance, override an installed package e.g. if you have a package that you are building from source in one directory, but have also installed using apt, sourcing the directory will ensure that the source version will be used).

Sourcing the local_setup.bash of the overlay will only add the packages available in the overlay to your environment, while sourcing setup.bash sources the overlay as well as the underlay it was created in, allowing the utilization of both workspaces.
$ source install/local_setup.bash
Coding in ROS 2
Programming conventions
In ROS 1 there was no clear convention on how to write nodes, but in ROS 2 nodes must be implemented by deriving from the class rclcpp::Node of the RCL library (the API documentation for the Node class of the rclcpp library can be found here).
This way the implemented nodes inherit all the basic Node functionalities like:
Creating a timer
Creating a publisher or a subscriber
Creating a server or a client
Interacting with parameters
As an example, take a look at a publisher node:
#include <chrono>
#include <functional>
#include <memory>
#include <string>

#include "rclcpp/rclcpp.hpp"
#include "std_msgs/msg/string.hpp"

using namespace std::chrono_literals;

/* This example creates a subclass of Node and uses std::bind() to register a
* member function as a callback from the timer. */

class MinimalPublisher : public rclcpp::Node
{
 public:
   MinimalPublisher()
   : Node("minimal_publisher"), count_(0)
   {
     publisher_ = this->create_publisher<std_msgs::msg::String>("topic", 10);
     timer_ = this->create_wall_timer(
     500ms, std::bind(&MinimalPublisher::timer_callback, this));
   }

 private:
   void timer_callback()
   {
     auto message = std_msgs::msg::String();
     message.data = "Hello, world! " + std::to_string(count_++);
     RCLCPP_INFO(this->get_logger(), "Publishing: '%s'", message.data.c_str());
     publisher_->publish(message);
   }
   rclcpp::TimerBase::SharedPtr timer_;
   rclcpp::Publisher<std_msgs::msg::String>::SharedPtr publisher_;
   size_t count_;
};

int main(int argc, char * argv[])
{
  rclcpp::init(argc, argv);
  rclcpp::spin(std::make_shared<MinimalPublisher>());
  rclcpp::shutdown();
  return 0;
}
Components and executors
In ROS 1 there was one executable per node, although several nodes could run in the same executable using the concept of nodelets (this is sometimes desirable for intense intra-process communications with limited hardware resources).
In ROS 2 nodelets are called components and are already included in the core functionality of ROS 2.
An Executor uses one or more threads of the underlying operating system to invoke the callbacks of subscriptions, timers, service servers, action servers, etc. on incoming messages and events. The explicit Executor class provides more control over execution management than the spin mechanism in ROS 1.
There are three types of executors:
SingleThreadedExecutor
MultiThreadedExecutor
StaticSingleThreadedExecutor
rclcpp::executors::SingleThreadedExecutor executor;
executor.add_node(node);
executor.spin();
rclcpp::Node::SharedPtr node1 = ...
rclcpp::Node::SharedPtr node2 = ...
rclcpp::Node::SharedPtr node3 = ...

rclcpp::executors::StaticSingleThreadedExecutor executor;
executor.add_node(node1);
executor.add_node(node2);
executor.add_node(node3);
executor.spin();
Further reading
Lifecycle nodes
In ROS 2, there is a type of node, the LifeCycleNode, whose lifetime is defined using states and the transitions between them, as shown in the figure (taken form [2]).
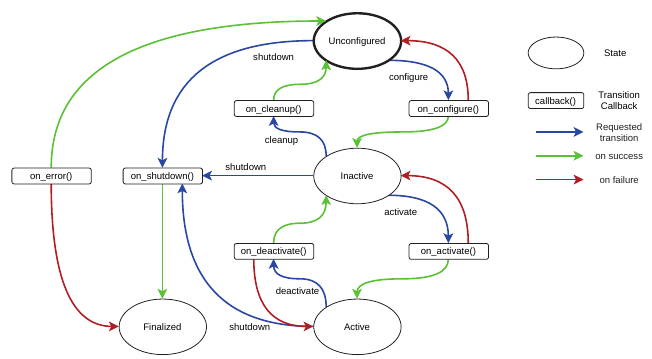
Lifecycle nodes provide a node execution model that allows:
Make them predictable, e.g. the parameters should be read only in the configuring transition.
Coordinate the startup of several nodes, e.g. do not activate specific nodes (like a sensor driver) until they are configured, or specify some orders in the startup.
Launch files
In ROS 2 Python is used to write launch files, which allows to customize files more easily, although XML and YAML can also be used.
from launch import LaunchDescription
from launch_ros.actions import Node

def generate_launch_description():
   return LaunchDescription([
       Node(
           package='turtlesim',
           namespace='turtlesim1',
           executable='turtlesim_node',
           name='sim'
       ),
       Node(
           package='turtlesim',
           namespace='turtlesim2',
           executable='turtlesim_node',
           name='sim'
       ),
       Node(
           package='turtlesim',
           executable='mimic',
           name='mimic',
           remappings=[
               ('/input/pose', '/turtlesim1/turtle1/pose'),
               ('/output/cmd_vel', '/turtlesim2/turtle1/cmd_vel'),
           ]
       )
   ])
Further reading
ROS 1 to ROS 2 transition
ROS 2 can be already used, although some third party plugins may still be missing or not stable enough.
If you already know ROS 1, and are going to start a brand new project, do it in ROS 2:
The ros2doctor tool can help you in identifying issues in your ROS 2 setup.
If you have a big ROS 1 infrastructure, then do the conversion gradually and use the ROS bridge:
The ROS bridge packge provides a network bridge which enables the exchange of messages between ROS 1 and ROS 2.
Video: How to communicate between ROS1 & ROS2 by The Construct.
Further reading