Tutorial 1: ROS basic concepts
Objective: This tutorial session is devoted to introduce the basic concepts of ROS, the install instructions and some command-line tools.
Contents
After this session you will be able to:
Describe the basic concepts of ROS.
Have ROS installed in your computer.
Run a simple ROS program and use the main basic ROS command-line tools to analyze it: rosnode, rqt_graph, rostopic, rosmsg.
Introduction
Download the pdf slides that include the following items:
ROS core components
Download the pdf slides that include the following items:
Communication infrastructure.
Robot-specific features.
Tools.
Applications
Teleoperation of a hand-arm system
A system composed of two industrial robots equipped with mechanical hands is teleoperated by an operator equipped with two sensorized gloves and two wrist trackers.
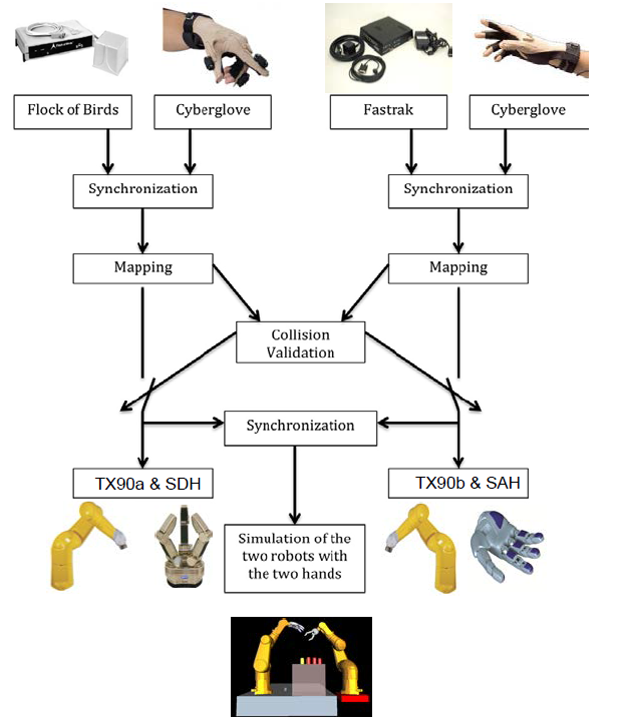
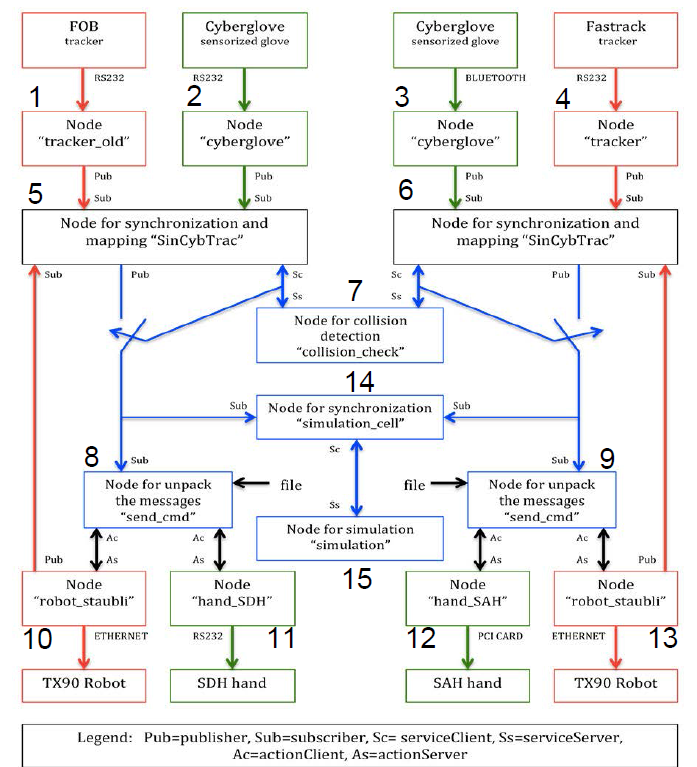
Nodes #1 to #4 broadcast glove and tracker data using Topics. Nodes #5 and#6 subscribe to them.
Nodes #5 and#6 perform the mapping and send queries to Node #7 (the collision-check node) using Services.
Nodes #5 and#6 broadcasted collision-free configurations using Topics. Nodes #8 and #9 subscribe to them.
Nodes #8 and #9 send the motion commands to Nodes #10 to #13 (the nodes that control the mechanical hands and the robots) using Actions.
An industrial mobile platform
Install instructions
These are the install instructions of all what is required to follow the Introduction to ROS course using your laptop (Ubuntu 20.04.1 O.S. is required).
The computers at the ETSEIB computer rooms are already prepared, and only your ~/.bashrc file needs to be tuned as specified in The ~/.bashrc file subsection.
Terminals
Teminator arranges terminals in a grid. It is useful since many terminals are usually needed simultaneouly when working with ROS. More info.
xterm is the standard terminal emulator for the X Window System; it will be used by some ROS nodes to print data to a terminal.
$ sudo apt install terminator
$ sudo apt install xterm
ROS
Install instructions of the Noetic version for Ubuntu. Detailed info.
$ sudo sh -c 'echo "deb http://packages.ros.org/ros/ubuntu $(lsb_release -sc) main" > /etc/apt/sources.list.d/ros-latest.list'
$ sudo apt install curl gnupg  # if you haven't already installed curl and gnupg
$ curl -s https://raw.githubusercontent.com/ros/rosdistro/master/ros.asc | sudo apt-key add -
$ sudo apt update
$ sudo apt install ros-noetic-desktop-full
$ sudo apt update
$ echo "source /opt/ros/noetic/setup.bash" >> ~/.bashrc
$ source ~/.bashrc
$ sudo apt install python3-rosdep python3-rosinstall python3-rosinstall-generator python3-wstool build-essential
$ sudo rosdep init
$ rosdep update
ROS is installed in /opt/ros/<distro>, e.g. /opt/ros/noetic. The source of the setup file /opt/ros/<distro>/setup.bash is normally added into your .bashrc in the installation process.
You can check the ROS environment variables (like ROS_ROOT, ROS_MASTER_URI or ROS_PACKAGE_PATH) using:
$ printenv | grep ROS
Other ROS packages
ROS Control
A set of packages that include controller interfaces, controller managers, transmissions and hardware_interfaces. More info.
$ sudo apt install ros-noetic-ros-control ros-noetic-ros-controllers
$ sudo apt install ros-noetic-rqt-controller-manager ros-noetic-rqt-joint-trajectory-controller
$ sudo apt install ros-noetic-ddynamic-reconfigure
$ sudo apt install ros-noetic-gazebo-ros-pkgs ros-noetic-gazebo-ros-control
ROS tf tutorials
tf is a package that lets the user keep track of multiple coordinate frames over time. More info.
$ sudo apt install ros-noetic-ros-tutorials ros-noetic-geometry-tutorials ros-noetic-rviz ros-noetic-rosbash ros-noetic-rqt-tf-tree
ROS joint state publisher GUI
Package to graphically control the joints of the robot using sliders.
$ sudo apt install ros-noetic-joint-state-publisher-gui
URDF tools
The Unified Robot Description Format (URDF) uses XML files to model robots, sensors and the working environment. These tools allows to check the correctness of URDF files.
$ sudo apt install liburdfdom-tools
Catkin tools
Python package that provides command line tools for working with the catkin meta‐buildsystem and catkin workspaces. More info.
$ sudo apt install python3-catkin-tools python3-osrf-pycommon
Catkin_lint
catkin_lint checks package configurations for the catkin build system of ROS. It runs a static analysis of the package.xml and CMakeLists.txt files in your package, and it will detect and report a number of common problems. More info.
$ sudo apt install catkin-lint
Git
Distributed version control system. More info.
$ sudo apt install git
$ git config --global user.name "Your Name"
$ git config --global user.email "you@example.com"
$ git config --global push.default simple
There are several Git clients with a GUI for Linux, like qgit:
$ sudo apt install qgit
The ~/.bashrc file
Environment setup
The ROS version being used should be defined in the ~/.bashrc file:
$ echo "source /opt/ros/noetic/setup.bash" >> ~/.bashrc
$ source ~/.bashrc
LC_NUMERIC
The LC_NUMERIC environment variable specifies the locale to use for the category determines the rules governing nonmonetary numeric formatting. It should be set as follows in the ~/.bashrc file:
$ echo 'export LC_NUMERIC="C"' >>~/.bashrc
$ source ~/.bashrc
Colored prompts
The ~/.bashrc file can be modified to put colored prompts and show in the terminal the git branch you are in.
# uncomment for a colored prompt, if the terminal has the capability; turned
# off by default to not distract the user: the focus in a terminal window
# should be on the output of commands, not on the prompt
force_color_prompt=yes
if [ -n "$force_color_prompt" ]; then
    if [ -x /usr/bin/tput ] && tput setaf 1 >&/dev/null; then
        # We have color support; assume it's compliant with Ecma-48
        # (ISO/IEC-6429). (Lack of such support is extremely rare, and such
        # a case would tend to support setf rather than setaf.)
        color_prompt=yes
    else
        color_prompt=
    fi
fi
parse_git_branch() {
 git branch 2> /dev/null | sed -e '/^[^*]/d' -e 's/* \(.*\)/ (\1)/'
}
if [ "$color_prompt" = yes ]; then
    PS1="${debian_chroot:+($debian_chroot)}\[\033[01;32m\]\u@\h\[\033[32m\]\w\[\033[33m\]\$(parse_git_branch)\[\033[00m\]$ "
else
    PS1='${debian_chroot:+($debian_chroot)}\u@\h:\w\$ '
fi
unset color_prompt force_color_prompt
Qt Creator IDE
Qt Creator provides a cross-platform, complete integrated development environment (IDE) for application developers to create applications for multiple desktop, embedded, and mobile device platforms. It is available for Linux, macOS and Windows operating systems. More info.
$ sudo apt install qtcreator
This IDE has the useful ROS Qt Creator Plug-in that provides capabilities like:
Import/Create Catkin Workspaces
Create Catkin Packages
Templates for basic node files, basic launch files and basic URDF files.
To install it follow the wiki install instruction here.
Atom Editor
A modern source code editor with a Git panel to manage changes. More info.
$ sudo snap install atom --classic
You can equip atom with different packages according to your edition needs.
You can follow the Preferences/Install menu to select those related to ROS: atom_ros, language-msg, language-cmake, build-catkin-tools.
ROS command-line tools
Running ROS
roscore is the first thing you should run when using ROS.
$ roscore
You should allow the master to continue running for the entire time that you’re using ROS.
One reasonable workflow is to start roscore in one terminal, then open other terminals for your “real” work.
There are not many reasons to stop roscore, except when you have finished working with ROS.
When you reach that point, you can stop the master by typing Ctrl-C in its terminal.
Note that ROS nodes connect to the master when they start up, and do not attempt to reconnect if that connection fails later on. Therefore, if you stop roscore, any other nodes running at the same time will be unable to establish new connections, even if you restart roscore later.
rosrun allows you to use the package name to directly run a node within a package (without having to know the package path).
$ rosrun [package_name] [executable_name]
Exercise
In three separate terminals, execute these three commands:
$ roscore
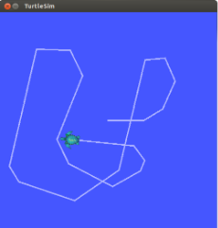
$ rosrun turtlesim turtlesim_node
$ rosrun turtlesim turtle_teleop_key
You should see a graphical window with a turtle-shaped robot that lives in a square world. If you give the input focus to the third terminal (the one executing the turtle_teleop_key command) and press the Up, Down, Left, or Right keys, the turtle will move in response to your commands, leaving a trail behind it.
The node name can be overridden adding a parameter to rosrun:
$ rosrun [package_name] [executable_name] __name:=node_name
To run simultaneously a collection of nodes, ROS provides a mechanism to configure and launch them, based on a lightweight xml file and the roslaunch program.
Getting information of the ROS graph
rosnode
rosnode displays information about the ROS nodes that are currently running. Its options are:
$ rosnode ping          test connectivity to node
$ rosnode list          list active nodes
$ rosnode info          print information about node
$ rosnode machine       list nodes running on a particular machine or list machines
$ rosnode kill          kill a running node
$ rosnode cleanup       purge registration information of unreachable nodes
The following command:
$ rosnode list
lists the names of the nodes that are running. Doing this after having executed the previous exercise results:
/rosout/teleop_turtle/turtlesim
The /rosout node is a special node that is started automatically by roscore. Its purpose is somewhat similar to the standard output (i.e. std::cout).
Notice that node names are not necessarily the same as the names of the executables underlying those nodes.
Exercise
Use info with the -q option to check the basic information of the /teleop_turtle and /turtlesim nodes.
The command:
$ rosnode kill [node name]
kills a node and unregisters it from the master (on the contrary, by using the Ctrl+C to kill a node does not unregister it, and a rosnode cleanup should be done later).
Note that killing and restarting a node usually does not have a major impact on other nodes.
Exercise
Kill the /turtlesim node and rerun it.
rqt_graph
rqt_graph is the easiest way to visualize the publish-subscribe relationships between ROS nodes.
The graph of the turtlesim example is:
$ rqt_graph
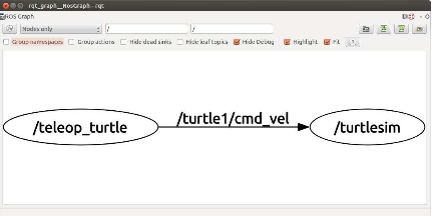
By unchecking the “Hide debug” box the graph shown is:
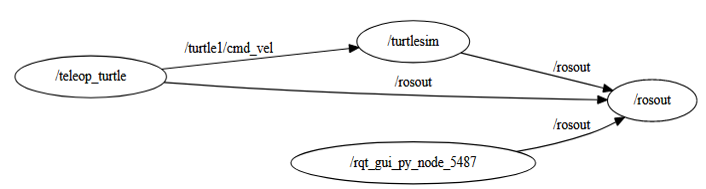
Notice that rqt_graph itself appears as a node
All of these nodes publish messages on the
/rosouttopicNotice that
/rosoutrefers to both a node and a topic. ROS doesn’t get confused by these kinds of duplicate names because it’s always clear from the context whether we want to talk about the /rosout node or/rosouttopic.
Exercise
Check again the “Hide Debug” option and then play with the options of the GUI menu.
rostopic
The rostopic tool allows you to get information about ROS topics (datarate, actual data, publishers, subscribers). Its options are:
$ rostopic -h
rostopic is a command-line tool for printing information about ROS Topics.

Commands:
      rostopic bw     display bandwidth used by topic
      rostopic delay  display delay of topic from timestamp in header
      rostopic echo   print messages to screen
      rostopic find   find topics by type
      rostopic hz     display publishing rate of topic
      rostopic info   print information about active topic
      rostopic list   list active topics
      rostopic pub    publish data to topic
      rostopic type   print topic or field type
Exercise
List all topics being broadcasted and check the publishing rate and the bandwidth consumed by the topic published by the /teleop_turtle node while teleoperating the turtle with the keys.
Even if you do not care much about the specific rates, these commands can be useful for debugging, because they provide an easy way to verify that messages are indeed being published regularly on particular topics.
Exercise
Echo the topic /turtle1/cmd_vel and visualize the output while teleoperating the turtle with the keys.
Exercise
Check the type of the topic /turtle1/cmd_vel.
rosmsg
rosmsg allows to see the structure of the message types, e.g.:
$ rosmsg show geometry_msgs/Twist
geometry_msgs/Vector3 linear
  float64 x
  float64 y
  float64 z
geometry_msgs/Vector3 angular
  float64 x
  float64 y
  float64 z
Exercise
Use the -h options to see all the options of rosmsg, then analyze the structure of the message type of the topic
/turtle1/pose.