Tutorial 2: Development Tools
Objective: This tutorial session is devoted to show the development tools used to create ROS programs in a collaborative environment.
Contents
After this session you will be able to:
Recall the C++ basics and understand the ROS build system.
Know the basics of control version using Git and have cloned your student git repository for the course.
Know the good practices to follow when writing ROS programs
Programming
Some C++ basics and resources
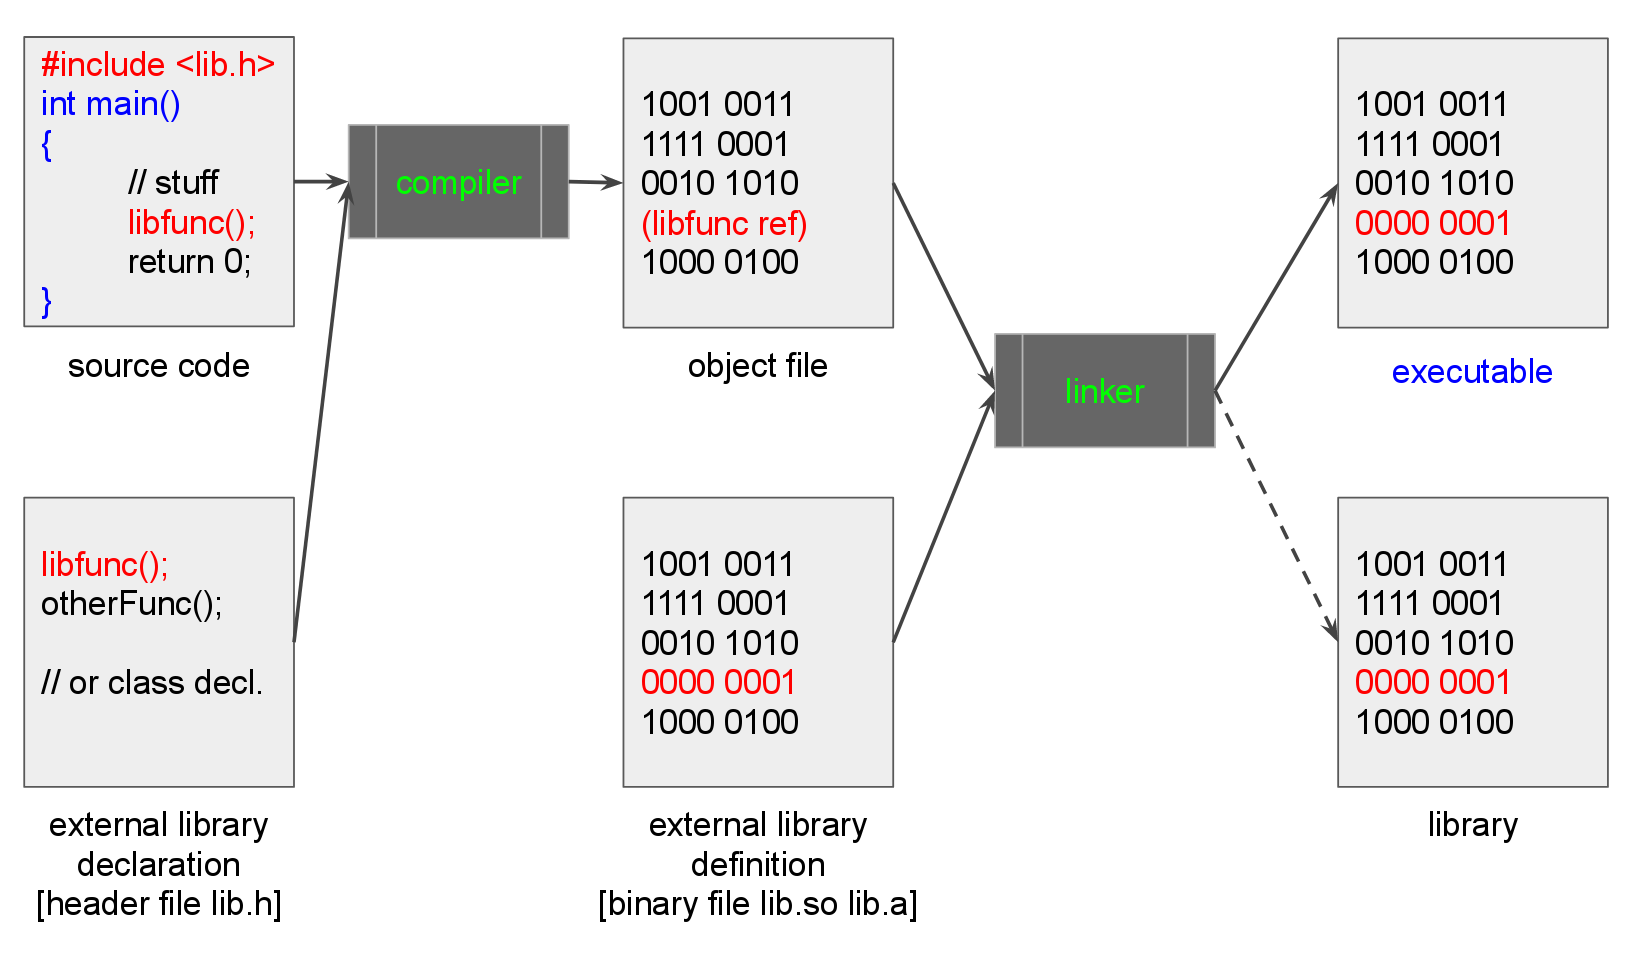
Compiling and linking
A talk from the Master
The Beauty and Power of “Primitive” C++: Plenary talk given by Bjarne Stroustrup at CppCon2020 (link to the video)
Building software
Any piece of software, like executables or libraries, built from raw source code are called ‘targets’ by the build systems. To build targets, the build system needs information such as:
The locations of tool chain components (e.g. C++ compiler).
Source code locations.
Code dependencies.
External dependencies.
Where those dependencies are located.
Which targets should be built.
Where targets should be built.
Where targets should be installed.
The required commands to generate a ‘target’ are well-defined. However the process to call them may be different. To illustrate this, this tutorial uses the basic Hello, world! C++ program using different ways to generate the executable file from its source C++ code. The section is based on A gentle introduction to catkin tutorial by Jonathan Bohren.
Exercise
Download the following source code in your working folder.
The source code provided contains a different folder for each alternative way. The executable will be generated:
By writing the dependencies by hand.
By using a Makefile.
By using CMake.
By using Catkin.
By using catkin_make.
By using the catkin tools.
Building by hand
Dependencies are explicitly written.
Prone to errors due to changes in the library paths.
Does not scale to large projects.
Generate the executable:
$ cd by_hand
$ g++ hello_world_node.cpp -o hello_world_node -I/opt/ros/noetic/include -L/opt/ros/noetic/lib -Wl,-rpath,/opt/ros/noetic/lib -lroscpp -lrosconsole
Start by running roscore:
$ roscore
Then, in another terminal, run the executable and return to the main folder (once the execution is terminated by pressing Ctrl+C):
$ ./hello_world_node
$ cd ..
Building with a Makefile
The GNU Make utility specifies rules to compile and link code using a Makefile file.
Makefiles separate the compilation and linking steps into two inter-dependent rules.
Makefiles make apparent which libraries are needed and where they are expected to be.
The Makefile for this example is:
1 2 3 4 5 6 7 8 9 10 11 12 13 14 15 | # Declare our preferred compiler
CC=g++
# Declare the compile flags
CFLAGS=-I/opt/ros/noetic/include
# Declare the linker flags
LDFLAGS=-L/opt/ros/noetic/lib -Wl,-rpath,/opt/ros/noetic/lib -lroscpp -lrosconsole
# A rule which satisfies any dependencies with the ".o" extension by compiling
# (but not linking) the corresponding ".cpp" file with the same basename
%.o: %.cpp
$(CC) -c -o $@ $< $(CFLAGS)
# A rule to build the hello_world_node program
hello_world_node: hello_world_node.o
$(CC) -o hello_world_node hello_world_node.o $(LDFLAGS)
|
Generate the executable:
$ cd by_makefile
$ make
Execute and return to the main folder:
$ ./hello_world_node
$ cd ..
Building with a Makefile and the pkg-config utility
Many libraries provide .pc files which describe their include directories, link directories, libraries, and other required flags, e.g. /opt/ros/noetic/lib/pkgconfig/roscpp.pc.
The pkg-config utility locates and manages them.
The Makefile for this example is now:
1 2 3 4 5 6 7 8 9 10 11 12 13 14 15 | # Declare our preferred compiler
CC=g++
# Declare the compile flags
CFLAGS=$(shell pkg-config --cflags roscpp)
# Declare the linker flags
LDFLAGS=$(shell pkg-config --libs roscpp)
# A rule which satisfies any dependencies with the ".o" extension by compiling
# (but not linking) the corresponding ".cpp" file with the same basename
%.o: %.cpp
$(CC) -c -o $@ $< $(CFLAGS)
# A rule to build the hello_world_node program
hello_world_node: hello_world_node.o
$(CC) -o hello_world_node hello_world_node.o $(LDFLAGS)
|
Generate the executable:
$ cd by_makefile2
$ make
Execute and return to the main folder:
$ ./hello_world_node
$ cd ..
Building with CMake
CMake is a cross-platform tool to build, test and package software.
CMake does not directly build the software, but generates the project of the most common platforms to build them, i.e. it writes the GNU Makefiles for you (and CMake is just better at it than you are!…) or generates projects for other platforms (e.g. Visual Studio projects in Windows or XCode projects in MacOS).
All the build rules for a given directory are specified in a file named CMakeLists.txt, which are more easily specified and that have commands like find_package(…) that gets not only the build flags for a package, but also all the flags for its dependencies.
The CMakeLists.txt for this example is:
1 2 3 4 5 6 7 8 9 10 11 12 13 14 15 | # Declare the version of the CMake API for forward-compatibility
cmake_minimum_required(VERSION 2.8)
# Declare the name of the CMake Project
project(hello_world_tutorial)
# Find and get all the information about the roscpp package
find_package(roscpp REQUIRED)
# Add the headers from roscpp
include_directories(${roscpp_INCLUDE_DIRS})
# Define an execuable target called hello_world_node
add_executable(hello_world_node hello_world_node.cpp)
# Link the hello_world_node target against the libraries used by roscpp
target_link_libraries(hello_world_node ${roscpp_LIBRARIES})
|
Generate the executable (following the common practice of keeping all the generated products in a directory called build):
$ cd by_cmake
$ mkdir build
$ cd build
$ cmake ..
$ make
Execute and return to the main folder:
$ ./hello_world_node
$ cd ../..
Building with catkin
Catkin is a collection of CMake macros and associated code used to build packages used in ROS.
Robotic developments are usually developed as a single monolithic CMake project with numerous switches depending on which components the user wants to build (with many modules not stable enough or broadly-distributed enough to justify building and hosting as binary packages).
The goal of Catkin is to make local collections of source-code-only packages behave more like system installations of binary packages. For this, all final build products (executables, libraries, etc.) are going to be written in a directory called devel.
Catkin configures CMake in a special way, also through CMakeLists.txt file.
Complementarily to the CMakeLists.txt, a package.xml manifest file is also required with metadata about the package including who’s responsible for it, its version, under which license it’s released, and its dependencies on other system packages and catkin packages.
The CMakeLists.txt for this example is now:
1 2 3 4 5 6 7 8 9 10 11 12 13 14 15 16 17 18 19 20 | # Declare the version of the CMake API for forward-compatibility
cmake_minimum_required(VERSION 2.8)
# Declare the name of the CMake Project
project(hello_world_tutorial)
# Find Catkin
find_package(catkin REQUIRED)
# Declare this project as a catkin package
catkin_package()
# Find and get all the information about the roscpp package
find_package(roscpp REQUIRED)
# Add the headers from roscpp
include_directories(${roscpp_INCLUDE_DIRS})
# Define an execuable target called hello_world_node
add_executable(hello_world_node hello_world_node.cpp)
# Link the hello_world_node target against the libraries used by roscpp
target_link_libraries(hello_world_node ${roscpp_LIBRARIES})
|
Generate the executable:
$ cd by_catkin
$ mkdir build
$ mkdir devel
$ cd build
$ cmake ../src/hello_world_tutorial  -DCATKIN_DEVEL_PREFIX=../devel
$ make
Execute and return to the main folder:
$ source ../devel/setup.bash
$ rosrun hello_world_tutorial hello_world_node
$ cd ../..
Building with catkin_make
The whole goal of Catkin is to make it easy to use numerous packages in a source-only workspace. The catkin_make tool, when run from the root of a Catkin workspace will both configure and build all targets in all packages, creating the build and devel folders.
For this, you need to have a unifying CMakeLists.txt to act as the root of the source tree. This file is provided by ROS at /opt/ros/noetic/share/catkin/cmake/toplevel.cmake and must be symbolically-linked into your src directory (using the command $ln -s /opt/ros/noetic/share/catkin/cmake/toplevel.cmake CMakeLists.txt or, more easily, with the command catkin_init_workspace as done below.
The cakin_make tool has several command-line options for specifying CMake argument (you can run $catkin_make -h for more information).
Generate the executable:
$ cd by_catkin2
$ catkin_init_workspace src
$ catkin_make
Execute and return to the main folder:
$ source devel/setup.bash
$ rosrun hello_world_tutorial hello_world_node
$ cd ..
Building with catkin tools
Catkin tools are a Python package that provides command line tools for working with the catkin meta-buildsystem and catkin workspaces, in a more simple and clean way (e.g. it eases the building of only one package).
Generate the executable:
$ cd by_catkin_tools
$ catkin init
$ catkin build hello_world_tutorial
Execute and return to the main folder:
$ source devel/setup.bash
$ rosrun hello_world_tutorial hello_world_node
$ cd ..
Catkin tools quick start
We recommend the use of catkin tools. To see all the catkin tools options type:
$ catkin --help
The most used will are:
The build verb is used to build one or more packages in a catkin workspace.
The clean verb makes it easier and safer to clean various products of a catkin workspace.
The config verb can be used to both view and manipulate a workspace’s configuration options (the configuration summary can be displayed by calling catkin config without any arguments).
The list verb is used to find and list information about catkin packages.
The init verb is the simplest way to initialize a catkin workspace so that it can be automatically detected automatically by other verbs which need to know the location of the workspace root.
More info at the catkin-tools webpage.
You can also follow a quick start tutorial (that includes a didactic video).
The ROS build system
In ROS projects, source code is organized into ‘packages’ where each package typically consists of one or more targets when built.
catkin is the custom ROS build system.
catkin’s workflow is very similar to CMake’s but adds support for automatic ‘find package’ infrastructure and building multiple, dependent projects at the same time.
ROS filesystem
The ROS filesystem main components are:
Packages: Packages are the main unit for organizing software in ROS. A package may contain:
ROS runtime processes (nodes),
a ROS-dependent library,
datasets,
configuration files.
Packages are the most atomic build item and release item in ROS.
Metapackages: Metapackages are specialized Packages which only serve to represent a group of related other packages (formerly called Stacks).
Repositories: A collection of packages which share a common Version Control System.
To obtain a list of all of the installed ROS packages use:
$ rospack list
To find the directory of a single package, use:
$ rospack find package_name
(you can use tab completion to avoid the need to remember the exact names or to prevent any kind of typos).
The catkin workspace
Packages that you create should live together in a directory called a workspace (usually called catkin_ws).
For many users, there’s no real need to use more than one ROS workspace, although it may be useful to maintain several independent workspaces if you’re working on many packages or have several distinct projects.
The workspace structure is the following:
workspace_folder/             -- WORKSPACE
    src/                      -- SOURCE SPACE
        package_1/
            CMakeLists.txt
            package.xml
        ...
        package_n/
            CMakeLists.txt
            package.xml
Package structure
Each package contains a package manifest and a CMakeLists.txt file.
The package manifest provides metadata about a package, including its name, version, description, license information, dependencies, and other meta information like exported packages. See the details at the ROS wiki (the newer format 2 is recommended over the older format 1).
<package format="2">
  <name>foo_core</name>
  <version>1.2.4</version>
  <description>
    This package provides foo capability.
  </description>
  <maintainer email="ivana@osrf.org">Ivana Bildbotz</maintainer>
  <license>BSD</license>
</package>
The CMakeLists.txt file describes the build instructions for the CMake. See the details at the ROS wiki.
1 2 3 4 5 6 7 8 9 10 11 12 13 14 15 16 17 18 19 20 | # Declare the version of the CMake API for forward-compatibility
cmake_minimum_required(VERSION 2.8)
# Declare the name of the CMake Project
project(hello_world_tutorial)
# Find Catkin
find_package(catkin REQUIRED)
# Declare this project as a catkin package
catkin_package()
# Find and get all the information about the roscpp package
find_package(roscpp REQUIRED)
# Add the headers from roscpp
include_directories(${roscpp_INCLUDE_DIRS})
# Define an execuable target called hello_world_node
add_executable(hello_world_node hello_world_node.cpp)
# Link the hello_world_node target against the libraries used by roscpp
target_link_libraries(hello_world_node ${roscpp_LIBRARIES})
|
To view the files in a package directory, use a command like this:
$ rosls package_name
The package directory (the one that contains the manifest file) stores most of the package’s files, with the following exceptions:
For packages installed by apt-get the executables are stored inside /opt/ros/noetic/bin
The autogenerated include files are stored inside /opt/ros/noetic/include
Creating a workspace and a package
Create a workspace and a void package (using catkin tools):
$ mkdir -p catkin_ws/src
$ cd catkin_ws/src
$ catkin create pkg agitr_hello --rosdistro noetic
Create a src folder inside the agitr_hello package directory to store the hello.cpp file found at https://www.cse.sc.edu/~jokane/agitr/agitr-examples.zip.
Exercise
Take a close look at the package.xml file, personalize it with your data and add the dependencies.
<?xml version="1.0"?>
  <package format="2">
  <name>agitr_hello</name>
  <version>0.0.1</version>
  <description>The agitr_hello package</description>
  <maintainer email="me@todo.todo">linux</maintainer>
  <license>TODO</license>

  <buildtool_depend>catkin</buildtool_depend>
</package>
(the dependencies declared in the manifest are not used in the build process; if you omit them here, you likely won’t see any error messages until you distribute your package to others who try to build it without having the required packages installed.)
Exercise
Take a close look at the CMakeLists.txt file and modify it by uncommenting and completing as shown below.
1 2 3 4 5 6 7 8 9 10 11 12 13 14 15 16 17 18 19 20 | # What version of CMake is needed?
cmake_minimum_required(VERSION 2.8.3)
# The name of this package.
project(agitr_hello)
# Find the catkin build system, and any other packages on which we depend.
find_package(catkin REQUIRED COMPONENTS roscpp)
# Declare our catkin package.
catkin_package()
# Specify locations of header files.
include_directories(include ${catkin_INCLUDE_DIRS})
# Declare the executable, along with its source files.
add_executable(hello src/hello.cpp)
# Specify libraries against which to link.
target_link_libraries(hello ${catkin_LIBRARIES})
|
Note that the package dependencies have been set, the executable has been declared and the libraries to be linked to have been added.
Take a look at the C++ code:
Build and run the package
From the catkin_ws folder, build the package using catkin build:
$ catkin build agitr_hello
Because catkin is designed to build all of the packages in your workspace, this command must be run from your workspace directory.
It performs several configuration steps and creates subdirectories called devel and build within your workspace.
These two new directories contain build-related files like automatically-generated makefiles, object code, and the executables themselves.
Run the executable:
$ source devel/setup.bash
$ rosrun agitr_hello hello
The automatically-generated setup.bash script has to be executed to set several environment variables that enable ROS to find your package and its newly-generated executables.
It is advisable to do a fresh build by running the catkin clean command, that eliminates the devel and build folders, before running the catkin build command.
Version control using GIT
Introduction to Git
Git is a distributed version control system. Git allows groups of people to work on the same documents (often code) at the same time, and without stepping on each other’s toes.
A repository, or Git project, encompasses the entire collection of files and folders associated with a project, along with each file’s revision history (the file history appears as snapshots in time called commits).
Repositories are self-contained units and anyone who owns a copy of the repository can access the entire codebase and its history.
Multiple lines of development, called branches may simultaneously exist.
Using the command line or other ease-of-use interfaces, a git repository also allows for: interaction with the history, cloning, creating branches, committing, merging, comparing changes across versions of code, and more.
Useful resources:
Basic Git commands
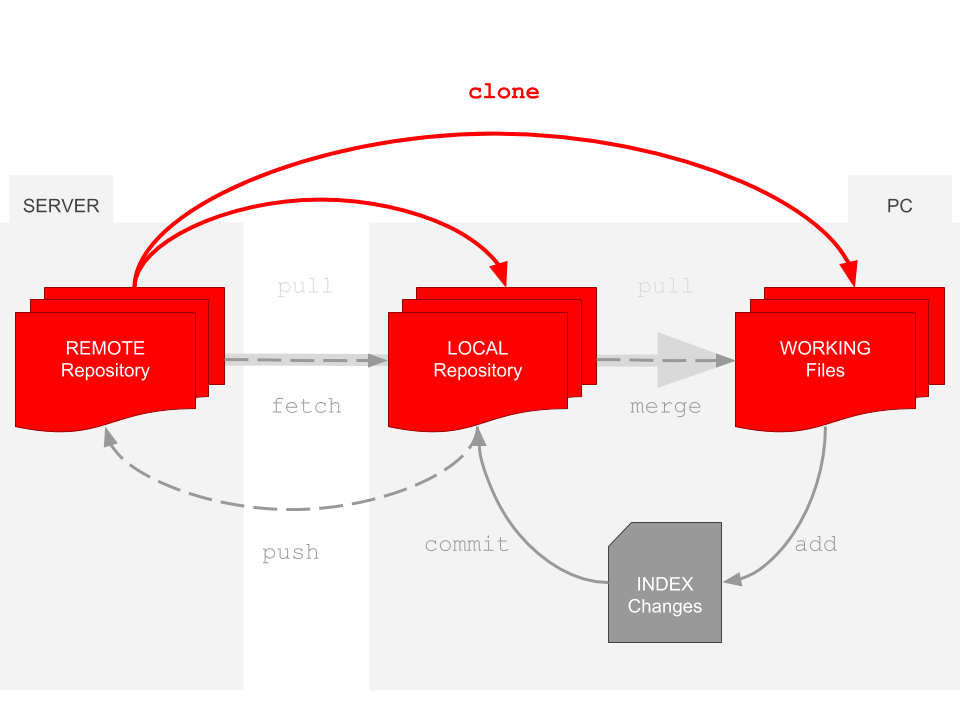
git init initializes a brand new Git repository and begins tracking an existing directory. It adds a hidden subfolder within the existing directory that houses the internal data structure required for version control.
git clone creates a local copy of a project that already exists remotely. The clone includes all the project’s files, history, and branches.
git add stages a change. Git tracks changes to a developer’s codebase, but it’s necessary to stage and take a snapshot of the changes to include them in the project’s history, using the git commit command.
git commit saves the snapshot to the project history and completes the change-tracking process. In short, a commit functions like taking a photo. Anything that’s been staged with git add will become a part of the snapshot with git commit.
git merge merges lines of development together. This command is typically used to combine changes made on two distinct branches. For example, a developer would merge when they want to combine changes from a feature branch into the master branch for deployment.
git pull updates the local line of development with updates from its remote counterpart. Developers use this command if a teammate has made commits to a branch on a remote, and they would like to reflect those changes in their local environment.
git push updates the remote repository with any commits made locally to a branch.
git status shows the status of changes as untracked, modified, or staged.
git branch shows the branches being worked on locally.
git checkout <branch> prepares for working on <branch>, switches to it by updating the index and the files in the working tree, and by pointing HEAD at the branch.
See a full reference guide to Git commands.
When several developers work on the same project it is advisable to work in separate branches:
Create a new branch
$ git checkout -b testbranch
Do the changes (and keep committing them)
Go back to master
$ git checkout master
Merge master with the branch
$ git merge testbranch
Delete the branch
$ git branch -d testbranch
Setting-up git and GitLab
GitLab is an open source end-to-end software development platform with built-in version control, and many aids for code development like issue tracking, code review, CI/CD (continuous integration and continuous delivery), and others.
Follow these steps (if you are in the ETSEIB computer rooms you can skip step 1):
Install git in your computer
$ sudo apt-get update
$ sudo apt-get install git
Set up your account data (name and email adress) used by Git to identify your commits:
$ git config --global user.name "Your Name"
$ git config --global user.email youremail@estudiantat.upc.edu
Set up the default push behavior as simple, which is the safest push option (it refuses to push if the upstream branch’s name is different from the local one):
$ git config --global push.default simple
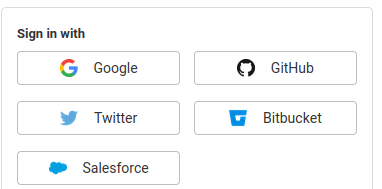
Sign in to GitLab at https://gitlab.com/ following the Sign in with Google button and using your UPC credentials.
Git repositories and meta-repositories
A given project is usually organized as a single git repository. To get a local copy of a git repository it must be cloned, e.g.:
$ git clone https://gitioc.upc.edu/rostutorials/agitr_chapter3.git
Nevertheless, some projects may be structured as a set of git repositories and therefore it is useful to store them together in what is called a meta-repository.
The meta-repository stores the references to the different git repositories, which are called submodules, instead of storing all the contents. The file .gitmodules contains the information of their names and urls.
To get a local copy of the repositories included in a git meta-repository, it must be cloned, and the submodules initialized and updated:
$ git clone https://gitioc.upc.edu/rostutorials/tutorial_2.git
$ cd tutorial_2
$ git submodule init
$ git submodule update
Alternatively, these three steps can be done with a single instruction:
$ git clone --recurse-submodules https://gitioc.upc.edu/rostutorials/tutorial_2.git
EXERCISE 0
The folder for the repositories
A meta-repository has been created with all the repositories used in these tutorials.
In your home directory create a folder called git-projects and clone there the repositories for all the tutorials:
$ git clone https://gitioc.upc.edu/rostutorials/all_introduction_to_ros_packages
$ cd all_introduction_to_ros_packages
$ git submodule init
$ git submodule update
Exercise 0.1
Execute the command git submodule status to verify that it contains the submodules demodoc and agitr_chapter4, used later in this tutorial.
Organization of GitLab for the course
GitLab allows to create groups for the development of different projects. With GitLab Groups, you can:
Assemble related projects together.
Grant members access to several projects at once.
Groups can also be nested in subgroups.
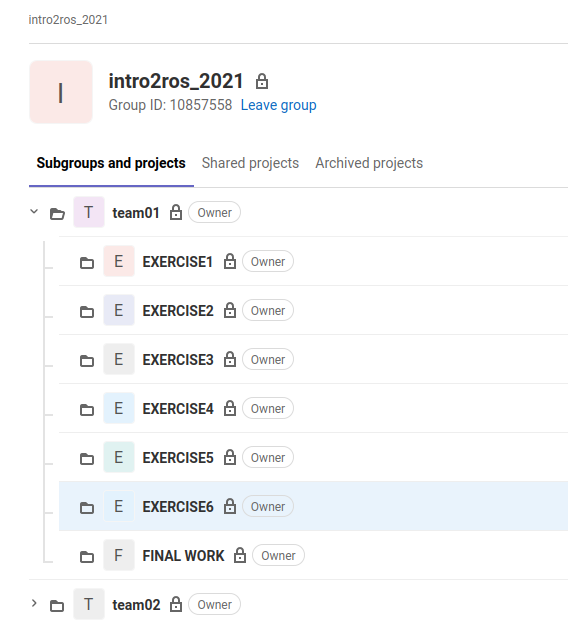
A group called intro2ros_2023 had been created with subgroups called team01, team02, …
The exercises proposed in these tutorials as well as the final project should be done in groups of 2 or 3 students.
The members of each group will be assigned to a team with Mantainer permissions, together with the professors of the course that have Owner permissions.
For each team, a subgroup per exercise (called EXERCISE0, EXERCISE1, EXERCISE2,…) has already been created, as well as one for the final project.
Exercise 0.2
Join in groups of 2 or 3 people and send an email to practros@mylist.upc.edu with the following info:
Names
Emails
Once assigned to a team you will receive an email and you will be able to see the group following the Groups menu:

The exercises proposed in the tutorials require the use (and the modification of some) of the packages provided in the meta-repository cloned before. For this purpose, in each of the EXERCISE subgroups, all the projects required to solve the exercise will be imported as explained in the following section. In this way, by cloning all the projects of an EXERCISE, the exercise shall be able to be executed.
Those packages of the all_introduction_to_ros_packages meta-repository that are needed to follow the tutorials but that are not required for any EXERCISE will not be imported.
Procedure to prepare the exercises
In each of the EXERCISE subgroups, all the projects required to solve the exercise will be imported.
The url required for the importing process can be obtained from the .gitmodule file in the ~/git-projects/all_introduction_to_ros_packages folder:

To work with them you will need to first import them within the EXERCISE subgroup, following these steps:
Create a new project:
Follow the Import option:

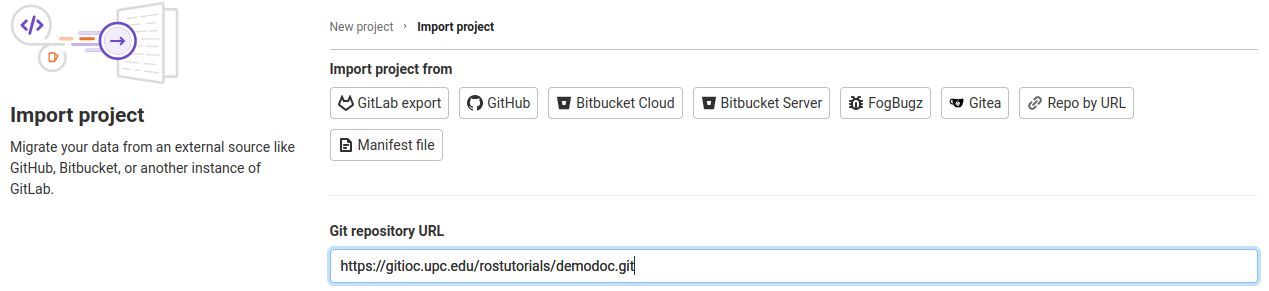
Chose to import By URL and write the URL for the demodoc project:
Write the name and press the Create button to finalize:

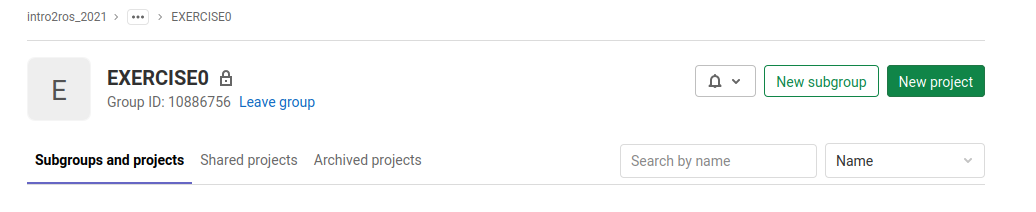
The imported project is already in the EXERCISE0 group:

Exercise 0.3
Reproduce those steps to import the demodoc project in the EXERCISE0 subgroup of your GitLab account. Repeat to import the agitr_chapter4 project in the EXERCISE0 subgroup of your GitLab account.
Exercise 0.4
In your git-projects folder, where you cloned the all_introduction_to_ros_packages meta-repository, clone the demodoc and agitr_chapter4 projects of your GitLab account inside an exercise0 subfolder (change XX by your team number). You can use https:
$ git clone https://gitlab.com/intro2ros/2023/teamXX/exercise0/demodoc.git exercise0/demodoc
$ git clone https://gitlab.com/intro2ros/2023/teamXX/exercise0/agitr_chapter4.git exercise0/agitr_chapter4
or ssh (by following first the instructions from here):
$ git clone git@gitlab.com:intro2ros/2023/teamXX/exercise0/demodoc.git exercise0/demodoc
$ git clone git@gitlab.com:intro2ros/2023/teamXX/exercise0/agitr_chapter4.git exercise0/agitr_chapter4
The catkin workspaces
A different catkin workspace will be used to follow each tutorial. First create them in e.g. your home directory:
$ mkdir -p catkin_ws2/src
$ mkdir -p catkin_ws3/src
$ mkdir -p catkin_ws4/src
$ mkdir -p catkin_ws5/src
$ mkdir -p catkin_ws6/src
$ mkdir -p catkin_ws7/src
$ mkdir -p catkin_ws8/src
$ mkdir -p catkin_ws9/src
$ mkdir -p catkin_ws10/src
$ mkdir -p catkin_wsFinalWork/src
Exercise 0.5
On the catkin_ws2/src folder make a link to the folders of the demodoc and agitr_chapter4 projects:
$ ln -s ~/git-projects/exercise0/demodoc
$ ln -s ~/git-projects/exercise0/agitr_chapter4
Build the projects:
$ cd ..
$ catkin build demodoc
$ catkin build agitr_chapter4
Now you can modify the source files in the ~/git-projects/demodoc/src or ~/git-projects/agitr_chapter4/src folders if required and add, commit and push the changes.
Tip
It is recommended to do many small commits, instead of a single large commit.
Testing the solution to the exercises
With the objective to automate the build process of all the packages required to test the solution of an exercise, a packages called solution_exerciseN has been created per exercise (with N being 1 to 7), that contains:
- A build.sh file, which is a script that:
creates a git-repo folder and a catkin_ws folder,
clones in the git-repo folder all the required packages to solve the exercise,
writes in the catkin_ws/src folder the soft links to the packages in the git-repo folder,
executes the catkin build command.
- A .gitlab-ci.yml file for continuous integration that, when a push is done:
executes the script build.sh
executes cakin_lint that does a static analysis of the package.xml and CMakeLists.txt files of the packages to detect any problem.
The following steps will prepare the tesing of EXERCISE 0:
Follow the procedure shown in Procedure to prepare the exercises to import in the intro2ros/2023/teamXX/EXERCISE0 subgroup of your GitLab account the package:
solution_exercise0: https://gitioc.upc.edu/rostutorials/solution_exercise0.git
In your git-projects folder clone the solution_exercise0 project of your GitLab account inside an exercise0 subfolder (change XX by your team number). You can use https:
$ git clone https://gitlab.com/intro2ros/2023/teamXX/exercise0/solution_exercise0.git exercise0/solution_exercise0
or ssh:
$ git clone git@gitlab.com:intro2ros/2023/teamXX/exercise0/solution_exercise0.git exercise0/solution_exercise0
Edit the build.sh file of the solution_exercise0 package to add your credencials (token_user and token_code that will be provided to you through an issue in your gitlab account) and push the change.
Execute the build.sh script and verify that the packages agitr_chapter4 and demodoc have been cloned and build.
Documenting the solution to the exercises
To document the solution of an exercise, edit the README.md file of in the solution_exerciseN package and explain in detail your solution.
See the Markdown Cheat Sheet that contains the main guides that will help you to write good README files.
Tip
Recall, a good README file makes the difference!!
Good practices
The cpp style guide
Coding style is important. A clean, consistent style leads to code that is more readable, debuggable, and maintainable. ROS provides a style guide to be followed in writing C++ code for ROS:
Some of the basic issues, naming and formating, are summarized below:
Naming
Packages: ROS packages names use under_scored naming, like roscpp or my_package. Naming convention allows only lowercase letters, numbers and underscores, being the first character a lowercase letter (catkin build tool will complain about packages not following this convention).
Topics/Services: ROS topics and service names are also under_scored, like /turtle1/cmd_vel or /spawn. Like everything else in ROS, every message type belongs to a specific package. Message type names always contain a slash, and the part before the slash is the name of the containing package:
/package_name/type_nameThis helps to prevent name collisions
Eases to see package dependencies
Files: All files are under_scored.
Classes/Types: Class names (and other type names) are CamelCased, e.g.:
class ExampleClass;Function / Methods: function and class method names are camelCased, and arguments are under_scored, e.g.:
int exampleMethod(int example_arg);Variables: In general, variable names are under_scored. It is recommended to use descriptive, non-cryptic names (longer variable names do not take more space in memory!). Constants use ALL_CAPITALS naming, variables members of a class are under_scored with an added trailing underscore added (e.g. int my_var_), global variables should be avoided but if used they are under_scored with a leading g_ added (e.g. int g_shutdown).
Namespaces: They are under_scored.
Formating
Indent each block by 2 spaces. Never insert literal tab characters.
The contents of a namespace are not indented.
Braces, both open and close, go on their own lines.
Documentation
The rosdoc_lite package wraps documentation tools like doxygen, sphinx, and epydoc, making it convenient to generate ROS package documentation.
In your computer you need to have doxygen and rosdoc_lite installed:
$ sudo apt-get install doxygen
$ sudo apt-get install ros-noetic-rosdoc-lite
To illustrate this documentation tool take a look at the package demodoc that contains one of the nodes used in the client-server tutorial.
To create the documentation move to the catkin_ws2/src/demodoc folder and type:
$ rosdoc_lite ~/catkin_ws2/src/demodoc -o doc
This will generate the documentation in the doc folder. Open the file doc/html/index.html and browse its contents. You can also browse it here.
Take a look at the files that have generated this documentation:
The source code src/pubvel_toggle_plus.cpp. You can see how the functions have been commented using Doxygen.
/*!
 * \brief toggleForward is a sevice that allows you to toggle between translational and rotational velocities to be published.
 *
 * Its arguments are the following:
 * \param req This is the request argument. No request argument is needed so it is of type empty std_srvs::Empty
 * \param resp This is the response argument. No request argument is needed so it is of type empty std_srvs::Empty
 */
 bool toggleForward(
    std_srvs::Empty::Request &req,
    std_srvs::Empty::Response &resp){
        forward = !forward;
        ROS_INFO_STREAM("Now sending "<<(forward?
               "forward":"rotate")<< " commands.");
    return true;
 }
The mainpage.dox file that contains the mainpage information.
/**
\mainpage

\b This is a packages used to illustrate the documentation using Doxygen and the rosdoc_lite utility.

This package is the same as agitr_chapter8 used to illustrate the client-server communication, but with added comments on the services and on the main function of the node.

\section Usage

\verbatim
$ rosrun pubvel_toggle_plus
\endverbatim

*/
A mainpage.dox.template is also provided as a template for the mainpage, that has been downloaded from here.
As you can see it is really easy to generate a good documentation of your code.
Logging
The ROS logging system
This section is based on chapter 4 of A gentle introduction ROS by Jason M. O’Kane.
rosout is the name of the console log reporting mechanism in ROS. The rosout package provides the rosout node for subscribing, logging, and republishing the messages.
It is a rich logging system, where log messages are classified into five groups called severity levels. The levels are, in order of increasing importance:
DEBUG
INFO
WARN
ERROR
FATAL
This variety of severity levels is intended to provide a consistent way to classify and manage log messages, but themselves don’t carry any inherent meaning (i.e. a FATAL message will not, in itself, end your program!).
Both printf- and stream-style formatting can be used:
ROS_DEBUG("Hello %s", "World");
ROS_DEBUG_STREAM("Hello " << "World");
Other advanced types of logging statements allow to enable/disable them based on different criteria:
Name:
ROS_DEBUG_NAMED("test_only", "Hello %s", "World");
ROS_DEBUG_STREAM_NAMED("test_only", "Hello " << "World");
Condition:
ROS_DEBUG_COND(x < 0, "Uh oh, x = %d, this is bad", x);
ROS_DEBUG_STREAM_COND(x < 0, "Uh oh, x = " << x << ", this is bad");
Name and condition:
ROS_DEBUG_COND_NAMED(x < 0, "test_only", "Uh oh, x = %d, this is bad", x);
ROS_DEBUG_STREAM_COND_NAMED(x < 0, "test_only", "Uh oh, x = " << x << ", this is bad");
The need not to repeat:
for (int i = 0; i < 10; ++i)
{
  ROS_DEBUG_ONCE("This message will only print once");
  ROS_DEBUG_STREAM_ONCE("This message will only print once, too");
}
Other advanced options can be found here.
For each node, a minimum severity level can be specified. The default logger level is INFO, which means that only the INFO severity level and higher will be generated. The logger level can be changed by calling a service:
rosservice call /node-name/set_logger_level ros.package_name level
or by using the GUI rqt_logger_level tool.
An example
The following example from the package agitr_chapter4 illustrates the generation of log messages:
The node generates log messages of different level:
1 2 3 4 5 6 7 8 9 10 11 12 13 14 15 16 17 18 19 20 21 22 23 24 25 26 27 28 | // This program periodically generates log messages at
// various severity levels.
#include <ros/ros.h>
int main(int argc, char **argv) {
// Initialize the ROS system and become a node.
ros::init(argc, argv, "count_and_log");
ros::NodeHandle nh;
// Generate log messages of varying severity regularly.
ros::Rate rate(10);
for(int i = 1;ros::ok();i++) {
ROS_DEBUG_STREAM("Counted to " << i);
if((i % 3) == 0) {
ROS_INFO_STREAM(i << " is divisible by 3.");
}
if((i % 5) == 0 ) {
ROS_WARN_STREAM(i << " is divisible by 5.");
}
if((i % 10) == 0) {
ROS_ERROR_STREAM(i << " is divisible by 10.");
}
if((i % 20) == 0) {
ROS_FATAL_STREAM(i << " is divisible by 20.");
}
rate.sleep();
}
}
|
Do Exercise 0.5, if not yet done, to build the agitr_chapter4 package in the catkin_ws2 workspace, and then run roscore (from a separate terminal) and run the count node from the catkin_ws2 folder:
$ source devel/setup.bash
$ rosrun agitr_chapter4 count
Now if the logger level is changed to ERROR, only the ERROR and FATAL messages will appear. Execute the following service call while the node is running to see the change in the messages being printed:
$ rosservice call /count_and_log/set_logger_level ros.agitr_chapter4 DEBUG
Exercise
Change to other severity levels using the set_logger_level service and check the results at the console.
Viewing log messages form the console
Log messages generated by a node are sent to the console if it has been run using rosrun or with roslaunch using the attribute –screen.
The format of the messages contain, by default, the severity level, the time and the message. This can be changed by setting the ROSCONSOLE_FORMAT environment variable (on the same console as the node is to be run). The file, the line, the function and the node can also be introduced. As an example the information of the node generating the message is added:
$ export ROSCONSOLE_FORMAT='[${severity}] [${time}] [node ${node} line ${line}]: ${message}'
$ rosrun agitr_chapter4 count
Exercise
Change the ROSCONSOLE_FORMAT variable to also include the other options.
Viewing log messages with the rqt_console
Every log message is also published on the topic /rosout. These log messages are of type rosgraph_msgs/Log. Take a look at the message fields:
$ rosmsg info rosgraph_msgs/Log
The /rosout node subscribes to this /rosout topic (the idea is that it is the only node subscribing to it) and then echoes them to the /rosout_agg topic (the /rosout node is the only publisher to the /rosout_agg topic).
Debugging tools can access the complete stream of log messages, without creating extra work for every node in the system, by subscribing to /rosout_agg. This is done by the rqt_console utility, that subscribes to the /rosout_agg topic and shows the log messages in a GUI.
$ rqt_console
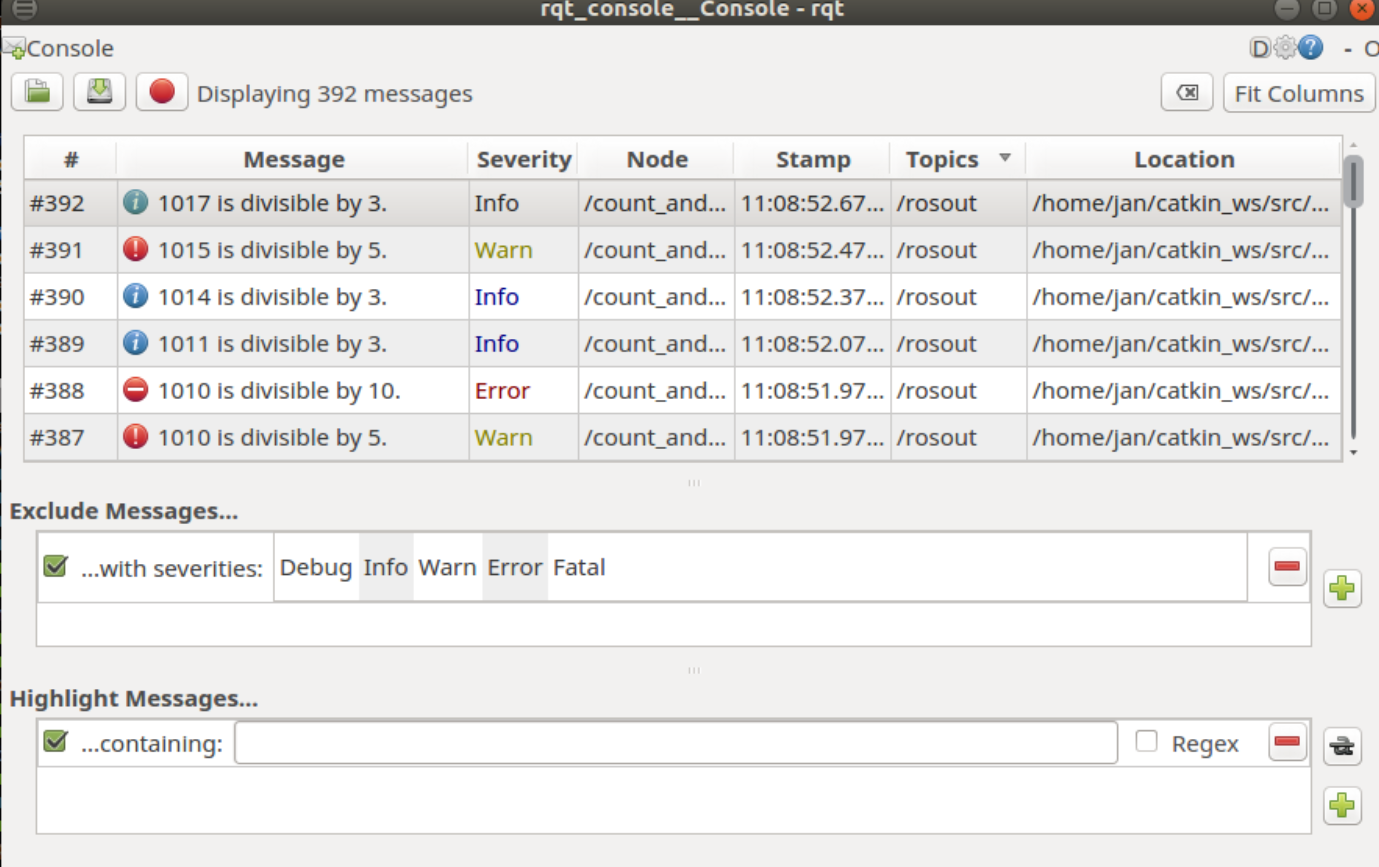
The rqt_console utility allows to filter the log messages shown by the severity level or according to other filters.
Viewing log messages in the log files
A rosout.log text file is written at ∼/.ros/log/run_id/rosout.log. The run_id is a universally-unique identifier (UUID) which is generated—based on your computer’s hardware MAC address and the time when the master was started, e.g. 6319b70c-261e-11e8-90c9-52540032b4e4.
The run_id can be checked as follows:
$ rosparam get /run_id
Exercise
Check your run_id folder and browse the rosout.log file.
The space consumed by this log folder can be checked and if it is too large and the files are no longer of interest, its contents can be deleted.
$ rosclean check
$ rosclean purge