Tutorial 8: Simulation - Sensors
Objective: This tutorial session is devoted to learn how to simulate sensors within Gazebo_ros.
Contents
After this session you will be able to:
Understand the plugin mechanisms for the simulation of sensors.
Use the 2D and 3D camera plugins.
Use a simulated camera and a fiducial marker detector to determine the pose of objects.
Know other available sensor plugins.
Provided packages:
This tutorial will use the following packages:
Package rrbot_descriptionPackage rrbot_gazeboPackage rrbot_controlPackage mastering_ros_robot_description_pkgPackage seven_dof_arm_gazebo_simplePackage gazebo_sensors_tutorialPackage aruco_rosPackage aruco_broadcaster
Prepare the catkin workspace to work with them:
If you have not yet done so, follow the steps in Exercise 0 to:
clone in your ~/git-projects folder the meta-repository containing all the required packages,
create the catkin workspace folders (use catkin_ws8 for the current tutorial).
Follow the procedure shown in Procedure to prepare the exercises to import in the intro2ros/2023/teamXX/EXERCISE5 subgroup of your GitLab account the package:
gazebo_sensors_tutorial: https://gitioc.upc.edu/rostutorials/gazebo_sensors_tutorial.git
solution_exercise5: https://gitioc.upc.edu/rostutorials/solution_exercise5.git
In your git-projects folder clone the gazebo_sensors_tutorial and solution_exercise5 projects of your GitLab account inside an exercise5 subfolder (change XX by your team number). You can use https:
$ git clone https://gitlab.com/intro2ros/2023/teamXX/exercise5/gazebo_sensors_tutorial.git exercise5/gazebo_sensors_tutorial
$ git clone https://gitlab.com/intro2ros/2023/teamXX/exercise5/solution_exercise5.git exercise5/solution_exercise5
or ssh:
$ git clone git@gitlab.com:intro2ros/2023/teamXX/exercise5/gazebo_sensors_tutorial.git exercise5/gazebo_sensors_tutorial
$ git clone git@gitlab.com:intro2ros/2023/teamXX/exercise5/solution_exercise5.git exercise5/solution_exercise5
In your catkin_ws8/src folder create a symbolic link to the packages to be used:
$ ln -s ~/git-projects/all_introduction_to_ros_packages/rrbot_description
$ ln -s ~/git-projects/all_introduction_to_ros_packages/rrbot_gazebo
$ ln -s ~/git-projects/all_introduction_to_ros_packages/rrbot_control
$ ln -s ~/git-projects/all_introduction_to_ros_packages/mastering_ros_robot_description_pkg
$ ln -s ~/git-projects/all_introduction_to_ros_packages/seven_dof_arm_gazebo_simple
$ ln -s ~/git-projects/exercise5/gazebo_sensors_tutorial
$ ln -s ~/git-projects/all_introduction_to_ros_packages/aruco_ros
$ ln -s ~/git-projects/all_introduction_to_ros_packages/aruco_broadcaster
Edit the build.sh file of the solution_exercise5 package to add your credencials (token_user and token_code) and push the change.
Finally, add the following line (adapted to your case) to the .bashrc file in order to find the Gazebo models used:
$ export GAZEBO_MODEL_PATH=~/catkin_ws8/src/gazebo_sensors_tutorial/models/:${GAZEBO_MODEL_PATH}
and source the file:
$ source ~/.bashrc
References:
This tutorial is partially based on several of the tutorials from gazebosim.org and on chapter 3 of the book Mastering ROS for Robotics Programming from Lentin Joseph.
More details can be found in these tutorials:
Sensors in Gazebo and ROS
Related to sensors, Gazebo provides:
The gazebo_models repository with some SDF models of sensors that include geometric descriptions and sensor features, like the camera.
A set of sensor classes, like CameraSensor, that define the behavior of the sensors. All of them inherit from class Sensor.
A set of plugins, like the camera plugin, that interface the corresponding sensor classes. They inherit from a general sensor plugin class that has access to the Sensor class.
Because Gazebo and ROS are separate projects that do not depend on each other, ROS sensor plugins have been implemented to wrap the Gazebo sensor plugins. The available ROS sensor plugins are available in the gazebo_plugins of gazebo_ros_pkgs, like those related to cameras and depth cameras.
Plugins can be added to SDF sensor models or to sensor models defined using URDF.
The cameras and depth camera sensors will be described next, their ROS plugins and their modeling using both SDF and URDF. Plugins for other sensors will be just listed in section ROS plugins for other sensors.
The camera sensor
The camera ROS plugin
The camera ROS plugin provides the ROS interface for simulating cameras by publishing the sensor_msgs::CameraInfo and sensor_msgs::Image ROS messages.
The ROS camera plugin is libgazebo_ros_camera.so. Some implementation details are included in Section Plugin implementation.
To associate the plugin to a given camera model, the following XML code has to be included in the SDF or URDF model description:
1 2 3 4 5 6 7 8 9 10 11 12 13 14 15 16 17 18 19 20 21 | <plugin name="camera_controller" filename="libgazebo_ros_camera.so">
<alwaysOn>true</alwaysOn>
<updateRate>0.0</updateRate>
<cameraName>camera</cameraName>
<imageTopicName>image_raw</imageTopicName>
<cameraInfoTopicName>camera_info</cameraInfoTopicName>
<frameName>camera_link_optical</frameName>
<!-- setting hackBaseline to anything but 0.0 will cause a misalignment
between the gazebo sensor image and the frame it is supposed to
be attached to -->
<hackBaseline>0.0</hackBaseline>
<distortionK1>0.0</distortionK1>
<distortionK2>0.0</distortionK2>
<distortionK3>0.0</distortionK3>
<distortionT1>0.0</distortionT1>
<distortionT2>0.0</distortionT2>
<CxPrime>0</CxPrime>
<Cx>0.0</Cx>
<Cy>0.0</Cy>
<focalLength>0.0</focalLength>
</plugin>
|
The main arguments to be particularized are:
<cameraName>: the camera name (camera)
<imageTopicName>: the topic name of the advertisedsensor_msgs::Imagemessage (image_raw)
<cameraInfoTopicName>: the topic name of the advertisedsensor_msgs::CameraInfomessage (camera_info)
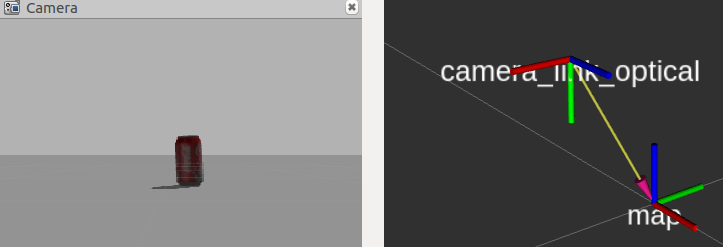
<frameName>: the coordinate frame the image is published under in the tf tree (camera_link_optical)
The <updateRate> is usually set to zero, which causes the plugin to publish information at the same rate as the parent SDF sensor (which is specified in the field <update_rate>, see below).
An SDF model
Among the models available at the Gazebo models repository, we can find sensors, like a camera or a kinect. These SDF files contain:
The inertial data and the collision and visual geometric descriptions.
A <sensor> element with information of the sensor, like image size and clip planes in the case of a camera.
The SDF model of the camera is:
1 2 3 4 5 6 7 8 9 10 11 12 13 14 15 16 17 18 19 20 21 22 23 24 25 26 27 28 29 30 31 32 33 34 35 36 37 38 39 40 41 42 43 44 45 46 | <?xml version="1.0" ?>
<sdf version="1.5">
<model name="camera">
<pose>0 0 0.05 0 0 0</pose>
<link name="link">
<inertial>
<mass>0.1</mass>
<inertia>
<ixx>0.000166667</ixx>
<iyy>0.000166667</iyy>
<izz>0.000166667</izz>
</inertia>
</inertial>
<collision name="collision">
<geometry>
<box>
<size>0.1 0.1 0.1</size>
</box>
</geometry>
</collision>
<visual name="visual">
<geometry>
<box>
<size>0.1 0.1 0.1</size>
</box>
</geometry>
</visual>
<sensor name="camera" type="camera">
<camera>
<horizontal_fov>1.047</horizontal_fov>
<image>
<width>320</width>
<height>240</height>
</image>
<clip>
<near>0.1</near>
<far>100</far>
</clip>
</camera>
<always_on>1</always_on>
<update_rate>30</update_rate>
<visualize>true</visualize>
</sensor>
</link>
</model>
</sdf>
|
The gazebo_sensors_tutorial package contains a models folder that includes this SDF camera sensor model modified to include the plugin XML code described above (the new model is called camera-plugin).
Exercise
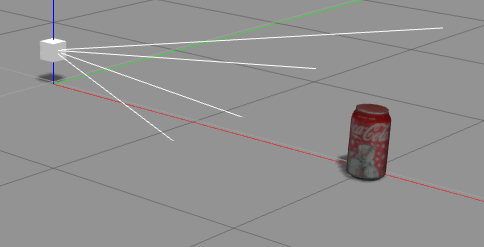
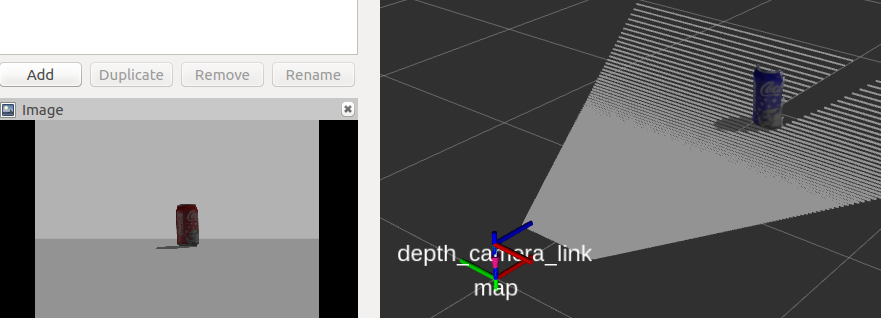
Take a look at the file model.sdf in the folder models/camera-plugin of the gazebo_sensors_tutorial package.
A launch file is provided to test this sensor model; it loads this camera and a coke can. The image message advertised can be visualized in rviz (that uses the camera_coke2.rviz configuration file where the Image Topic has been set to /camera/image_raw). The launch file to run rviz uses a static_transform_publisher to visualize the camera reference frame (called camera_link_optical):
$ catkin build gazebo_sensors_tutorial
$ source devel/setup.bash
$ roslaunch gazebo_sensors_tutorial camera_coke_gazebo2.launch
$ rostopic list
$ rostopic echo /camera/camera_info
$ roslaunch gazebo_sensors_tutorial camera_coke_rviz2.launch
A URDF model
URDF robot models may contain description of sensors with the associated plugins. As an example, package rrbot_description includes in the rrbot.xacro file an end-effector link called camera_link associated to a camera. It contains all the visual and collision geometric descriptions (in this case a simple cube). Complementary, the rrbot.gazebo file contains an associated <gazebo> tag that includes the <sensor> element (that is directly passed to the <sdf> model) with the camera features and the plugin used with the following key information:
the camera name (rrbot/camera1)
the topic name of the advertised
sensor_msgs::Imagemessage (image_raw)the topic name of the advertised
sensor_msgs::CameraInfomessage (camera_info)the coordinate frame the image is published under in the tf tree (camera_link)
1 2 3 4 5 6 7 8 9 10 11 12 13 14 15 16 17 18 19 20 21 22 23 24 25 26 27 28 29 30 31 32 33 34 35 36 37 38 39 40 41 42 43 44 45 46 47 | <!-- camera -->
<gazebo reference="camera_link">
<sensor type="camera" name="camera1">
<update_rate>30.0</update_rate>
<camera name="head">
<horizontal_fov>1.3962634</horizontal_fov>
<image>
<width>800</width>
<height>800</height>
<format>R8G8B8</format>
</image>
<clip>
<near>0.02</near>
<far>300</far>
</clip>
<noise>
<type>gaussian</type>
<!-- Noise is sampled independently per pixel on each frame.
That pixel's noise value is added to each of its color
channels, which at that point lie in the range [0,1]. -->
<mean>0.0</mean>
<stddev>0.007</stddev>
</noise>
</camera>
<plugin name="camera_controller" filename="libgazebo_ros_camera.so">
<alwaysOn>true</alwaysOn>
<updateRate>0.0</updateRate>
<cameraName>rrbot/camera1</cameraName>
<imageTopicName>image_raw</imageTopicName>
<cameraInfoTopicName>camera_info</cameraInfoTopicName>
<frameName>camera_link_optical</frameName>
<!-- setting hackBaseline to anything but 0.0 will cause a misalignment
between the gazebo sensor image and the frame it is supposed to
be attached to -->
<hackBaseline>0.0</hackBaseline>
<distortionK1>0.0</distortionK1>
<distortionK2>0.0</distortionK2>
<distortionK3>0.0</distortionK3>
<distortionT1>0.0</distortionT1>
<distortionT2>0.0</distortionT2>
<CxPrime>0</CxPrime>
<Cx>0.0</Cx>
<Cy>0.0</Cy>
<focalLength>0.0</focalLength>
</plugin>
</sensor>
</gazebo>
|
The advertised images can be visualized using rviz. Follow the instruction below to load the rrbot and a coke can and to open rviz (in this case the Image Topic field is filled with the topic /rrbot/camera1/image_raw).
$ catkin build rrbot_description
$ catkin build rrbot_gazebo
$ source devel/setup.bash
$ roslaunch rrbot_gazebo rrbot_world_2.launch
$ rosrun gazebo_ros spawn_model -database coke_can -sdf -model coke_can -y 0.5 -x -1.2
$ roslaunch rrbot_description rrbot_rviz_2.launch
Move the coke can and visualize the motion in Rviz:
$ rosservice call /gazebo/apply_body_wrench '{body_name: "coke_can::link", reference_frame: "world", reference_point: { x: 0.0, y: 0.0, z: 0.0 }, wrench: { force: { x: 0.0, y: -4.0, z: 0.0 }, torque: { x: 0.0, y: 0.0, z: 0.0 } }, start_time: { secs: 0, nsecs: 0 }, duration: { secs: 2, nsecs: 0 } }'
Plugin implementation
The class GazeboRosCamera implements the camera plugin in the file gazebo_ros_camera.cpp. Some few key aspects are commented next, related to the advertisement of the ROS topics.
The class GazeboRosCamera inherits from classes CameraPlugin and GazeboRosCameraUtils. The plugin controller is continually updated with the function GazeboRosCamera::OnNewFrame shown below, that advertises the camera image and the camera info (lines 34 and 35):
1 2 3 4 5 6 7 8 9 10 11 12 13 14 15 16 17 18 19 20 21 22 23 24 25 26 27 28 29 30 31 32 33 34 35 36 37 38 39 40 | ////////////////////////////////////////////////////////////////////////////////
// Update the controller
void GazeboRosCamera::OnNewFrame(const unsigned char *_image,
unsigned int _width, unsigned int _height, unsigned int _depth,
const std::string &_format)
{
common::Time sensor_update_time = this->parentSensor_->LastMeasurementTime();
if (!this->parentSensor->IsActive())
{
if ((*this->image_connect_count_) > 0)
// do this first so there's chance for sensor to run once after activated
this->parentSensor->SetActive(true);
}
else
{
if ((*this->image_connect_count_) > 0)
{
if (sensor_update_time < this->last_update_time_)
{
ROS_WARN_NAMED("camera", "Negative sensor update time difference detected.");
this->last_update_time_ = sensor_update_time;
}
// OnNewFrame is triggered at the gazebo sensor <update_rate>
// while there is also a plugin <updateRate> that can throttle the
// rate down further (but then why not reduce the sensor rate?
// what is the use case?).
// Setting the <updateRate> to zero will make this plugin
// update at the gazebo sensor <update_rate>, update_period_ will be
// zero and the conditional always will be true.
if (sensor_update_time - this->last_update_time_ >= this->update_period_)
{
this->PutCameraData(_image, sensor_update_time);
this->PublishCameraInfo(sensor_update_time);
this->last_update_time_ = sensor_update_time;
}
}
}
}
|
The GazeboRosCamera::OnNewFrame advertises the camera image and the camera info by calling the functions PutCameraData and PublishCameraInfo, respectively, which are implemented by the GazeboRosCameraUtils parent class in GazeboRosCameraUtils.cpp file:
The following
PutCameraDatafunction is where the image topic is actually published (line 20):
1 2 3 4 5 6 7 8 9 10 11 12 13 14 15 16 17 18 19 20 21 22 | void GazeboRosCameraUtils::PutCameraData(const unsigned char *_src)
{
if (!this->initialized_ || this->height_ <=0 || this->width_ <=0)
return;
if ((*this->image_connect_count_) > 0)
{
boost::mutex::scoped_lock lock(this->lock_);
// copy data into image
this->image_msg_.header.frame_id = this->frame_name_;
this->image_msg_.header.stamp.sec = this->sensor_update_time_.sec;
this->image_msg_.header.stamp.nsec = this->sensor_update_time_.nsec;
// copy from src to image_msg_
fillImage(this->image_msg_, this->type_, this->height_, this->width_,
this->skip_*this->width_, reinterpret_cast<const void*>(_src));
// publish to ros
this->image_pub_.publish(this->image_msg_);
}
}
|
The following
PublishCameraInfofunction is where the camera info topic is actually published (line 8):
1 2 3 4 5 6 7 8 9 | void GazeboRosCameraUtils::PublishCameraInfo(ros::Publisher camera_info_publisher)
{
sensor_msgs::CameraInfo camera_info_msg = camera_info_manager_->getCameraInfo();
camera_info_msg.header.stamp.sec = this->sensor_update_time_.sec;
camera_info_msg.header.stamp.nsec = this->sensor_update_time_.nsec;
camera_info_publisher.publish(camera_info_msg);
}
|
The depth camera sensor
The depth camera ROS plugin
The depth camera ROS plugin simulates a depth sensor like an Xbox-Kinect. The depth camera ROS plugin provides the ROS interface for simulating depth cameras by publishing the sensor_msgs::CameraInfo, sensor_msgs::Image and sensor_msgs::PointCloud2 ROS messages.
The ROS depth camera plugin is libgazebo_ros_openni_kinect.so. Some implementation details are included in Section Plugin implementation.
To associate the plugin to a given depth camera model, the following XML code has to be included in the SDF or URDF model description:
1 2 3 4 5 6 7 8 9 10 11 12 13 14 15 16 17 18 19 20 21 22 23 24 25 | <plugin name="camera_plugin" filename="libgazebo_ros_openni_kinect.so">
<baseline>0.2</baseline>
<alwaysOn>true</alwaysOn>
<!-- Keep this zero, update_rate in the parent <sensor> tag
will control the frame rate. -->
<updateRate>20.0</updateRate>
<cameraName>camera_ir</cameraName>
<imageTopicName>/camera/color/image_raw</imageTopicName>
<cameraInfoTopicName>/camera/color/camera_info</cameraInfoTopicName>
<depthImageTopicName>/camera/depth/image_raw</depthImageTopicName>
<depthImageCameraInfoTopicName>/camera/depth/camera_info</depthImageCameraInfoTopicName>
<pointCloudTopicName>/camera/depth/points</pointCloudTopicName>
<frameName>depth_camera_link</frameName>
<pointCloudCutoff>0.05</pointCloudCutoff>
<distortionK1>0</distortionK1>
<distortionK2>0</distortionK2>
<distortionK3>0</distortionK3>
<distortionT1>0</distortionT1>
<distortionT2>0</distortionT2>
<CxPrime>0</CxPrime>
<Cx>0</Cx>
<Cy>0</Cy>
<focalLength>0</focalLength>
<hackBaseline>0</hackBaseline>
</plugin>
|
The main arguments to be particularized are:
the camera name (camera_ir)
the name of the image topic (
sensor_msgs::Imagemessage /camera/color/image_raw)the name of the camera info topic (
sensor_msgs::CameraInfomessage /camera/color/camera_info)the name of the depth image topic (
sensor_msgs::Imagemessage /camera/depth/image_raw)the name of the depth camera info (
sensor_msgs::CameraInfomessage /camera/depth/camera_info) - this is the same as the camera info topic, but is only advertised when someone is subcribed to the other depth topics.the name of the point cloud topic (
sensor_msgs::PointCloud2message /camera/depth/points)the coordinate frame the data is published under in the tf tree (depth_camera_link)
An SDF model
As done for the camera, the SFD model of a kinect has been retrieved from the Gazebo models database and enlarged with the plugin info.
The SDF model of the kinect depth camera is:
1 2 3 4 5 6 7 8 9 10 11 12 13 14 15 16 17 18 19 20 21 22 23 24 25 26 27 28 29 30 31 32 33 34 35 36 37 38 39 40 | <?xml version="1.0" ?>
<sdf version="1.5">
<model name="kinect">
<pose>0 0 0.036 0 0 0</pose>
<link name="link">
<inertial>
<mass>0.1</mass>
</inertial>
<collision name="collision">
<geometry>
<box>
<size>0.073000 0.276000 0.072000</size>
</box>
</geometry>
</collision>
<visual name="visual">
<geometry>
<mesh>
<uri>model://kinect/meshes/kinect.dae</uri>
</mesh>
</geometry>
</visual>
<sensor name="camera" type="depth">
<update_rate>20</update_rate>
<camera>
<horizontal_fov>1.047198</horizontal_fov>
<image>
<width>640</width>
<height>480</height>
<format>R8G8B8</format>
</image>
<clip>
<near>0.05</near>
<far>3</far>
</clip>
</camera>
</sensor>
</link>
</model>
</sdf>
|
The gazebo_sensors_tutorial package contains a models folder that includes this SDF kinect sensor model modified to include the plugin XML code described above (the new model is called kinect-plugin).
Exercise
Take a look at the file model.sdf in the folder models/kinect-plugin of the gazebo_sensors_tutorial package.
A launch file is provided to test this sensor model; it loads this kinect sensor and a coke can. The image message advertised can be visualized in rviz:
$ roslaunch gazebo_sensors_tutorial kinect_coke_gazebo2.launch
$ roslaunch gazebo_sensors_tutorial kinect_coke_rviz.launch

A URDF model
The seven d.o.f. robot used in previous tutorials (taken from the book Mastering ROS for Robotics Programming) has also been prepared to be used within Gazebo.
The seven_dof_arm_gazebo package contains the launch file called seven_dof_arm_with_rgbd_world.launch that runs Gazebo and spawns the xacro model of the robot described in seven_dof_arm_with_rgbd.xacro file of the mastering_ros_robot_description_pkg package, that contains the robot and a depth camera:
Exercise
Take a look at the following files in the urdf/sensors folder of the mastering_ros_robot_description_pkg package:
xtion_pro_live.gazebo.xacro, where a xacro:macro is used to define the depth camera sensor and its plugin,
xtion_pro_live.urdf.xacro, where a xacro:macro is used to define the camera geometry and reference frames
Now launch the demo scene in Gazebo and visualize the 3D data with rviz:
$ catkin build mastering_ros_robot_description_pkg
$ catkin build seven_dof_arm_gazebo
$ source devel/setup.bash
$ roslaunch seven_dof_arm_gazebo seven_dof_arm_with_rgbd_world.launch
$ rosrun gazebo_ros spawn_model -database coke_can -sdf -model coke_can -x 0.4
$ roslaunch gazebo_sensors_tutorial kinect_arm_rviz.launch

Plugin implementation
The class GazeboRosOpenniKinect implements the depth camera plugin in the file gazebo_ros_openni_kinect.cpp. Some few key aspects are commented next, related to the advertisement of the ROS topics.
The class GazeboRosOpenniKinect inherits from classes DepthCameraPlugin and GazeboRosCameraUtils. The depth information is updated with the function GazeboRosOpenniKinect::OnNewDepthFrame shown next, that advertises the point cloud data and the depth image (lines 22 and 25):
1 2 3 4 5 6 7 8 9 10 11 12 13 14 15 16 17 18 19 20 21 22 23 24 25 26 27 28 29 30 31 32 33 34 35 36 | ////////////////////////////////////////////////////////////////////////////////
// Update the controller
void GazeboRosOpenniKinect::OnNewDepthFrame(const float *_image,
unsigned int _width, unsigned int _height, unsigned int _depth,
const std::string &_format)
{
if (!this->initialized_ || this->height_ <=0 || this->width_ <=0)
return;
this->depth_sensor_update_time_ = this->parentSensor->LastMeasurementTime();
if (this->parentSensor->IsActive())
{
if (this->point_cloud_connect_count_ <= 0 &&
this->depth_image_connect_count_ <= 0 &&
(*this->image_connect_count_) <= 0)
{
this->parentSensor->SetActive(false);
}
else
{
if (this->point_cloud_connect_count_ > 0)
this->FillPointdCloud(_image);
if (this->depth_image_connect_count_ > 0)
this->FillDepthImage(_image);
}
}
else
{
if (this->point_cloud_connect_count_ > 0 ||
this->depth_image_connect_count_ <= 0)
// do this first so there's chance for sensor to run 1 frame after activate
this->parentSensor->SetActive(true);
}
PublishCameraInfo();
}
|
The function GazeboRosOpenniKinect::FillPointdCloud is where the point-cloud advertising is actually done (line 21):
1 2 3 4 5 6 7 8 9 10 11 12 13 14 15 16 17 18 19 20 21 22 23 24 | ////////////////////////////////////////////////////////////////////////////////
// Put point cloud data to the interface
void GazeboRosOpenniKinect::FillPointdCloud(const float *_src)
{
this->lock_.lock();
this->point_cloud_msg_.header.frame_id = this->frame_name_;
this->point_cloud_msg_.header.stamp.sec = this->depth_sensor_update_time_.sec;
this->point_cloud_msg_.header.stamp.nsec = this->depth_sensor_update_time_.nsec;
this->point_cloud_msg_.width = this->width;
this->point_cloud_msg_.height = this->height;
this->point_cloud_msg_.row_step = this->point_cloud_msg_.point_step * this->width;
///copy from depth to point cloud message
FillPointCloudHelper(this->point_cloud_msg_,
this->height,
this->width,
this->skip_,
(void*)_src );
this->point_cloud_pub_.publish(this->point_cloud_msg_);
this->lock_.unlock();
}
|
Using sensors
Image rectification
The image_proc package contains the image_proc node, which its main purpose is to remove camera distortion from the raw image stream, and therefore acts between the camera driver and the vision processing nodes.

Subscribed Topics
image_raw (sensor_msgs/Image): Raw image stream from the camera driver.
camera_info (sensor_msgs/CameraInfo): Camera metadata.
Published Topics
image_mono (sensor_msgs/Image): Monochrome unrectified image.
image_rect (sensor_msgs/Image): Monochrome rectified image.
image_color (sensor_msgs/Image): Color unrectified image.
image_rect_color (sensor_msgs/Image): Color rectified image.
The image_proc node must run in the camera namespace, e.g. for a camera named /my_camera which is publishing the topics /my_camera/image_raw and /my_camera/camera_info it should be run as:
$ ROS_NAMESPACE=my_camera rosrun image_proc image_proc
Or within a launch file as:
<env name="ROS_NAMESPACE" value="my_camera"/>
<node name="image_proc" pkg=" image_proc" type="image_proc"/>
Or alternatively as:
<node ns="my_camera" name="image_proc" pkg=" image_proc" type="image_proc"/>
The ArUco library
As an application example, the estimation of the poses of objects will be tackled using the ArUco library, an open-source library for fast camera pose estimation using squared markers, and the aruco_ros package that wraps it. There are two alternatives nodes:
The aruco_ros nodes of type single look for a given marker ID and if found publishes several messages with its information (e.g. a geometry_msgs/PoseStamped with the pose and a visualization_msgs/Marker with the rviz marker), and a tf added to the tf_tree.
The aruco_ros nodes of type marker_publisher publishes a message of type aruco_msgs/MarkerArray with the information of the IDs and poses of all the markers found.
The aruco_ros nodes of type single
If there are few markers to be detected, which may also be different size, a node of type single should be run for each marker ID to be detected, as illustrated below.
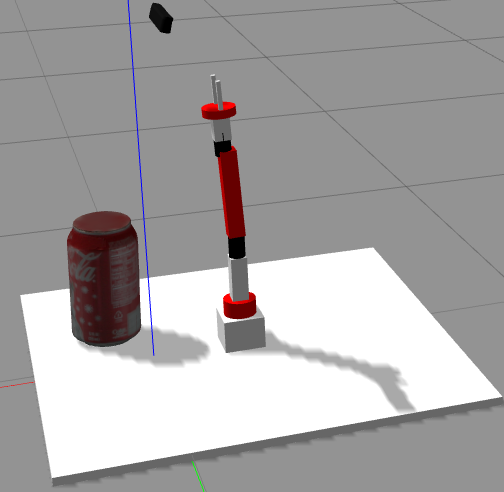
Start by launching gazebo with a world that includes a camera and then spawning two objects with ArUco markers, the aruco_cube model with marker ID 582 and the pawnB1 model with marker ID 201 (recall to update the GAZEBO_MODEL_PATH as pointed out in the start of the tutorial in order to find the models):
$ roslaunch gazebo_sensors_tutorial camera_gazebo2.launch
$ rosrun gazebo_ros spawn_model -database aruco_cube -sdf -model aruco_cube  -x 0.11 -z 0.05
$ rosrun gazebo_ros spawn_model -database pawnB1 -sdf -model pawnB1 -x 0.1 -y -0.1 -z 0.02
Then run the following launch file that:
Starts two ArUco nodes, tuned to detect each of the two markers by specifying:
the marker ID,
the marker size,
the marker frame
the reference frame
A node that subscribes to the published marker poses and broadcasts a transform located at the center of the objects.
Starts rviz to visualize the detected markers and all the transforms.
$ roslaunch gazebo_sensors_tutorial camera_aruco_cube_rviz-2.launch
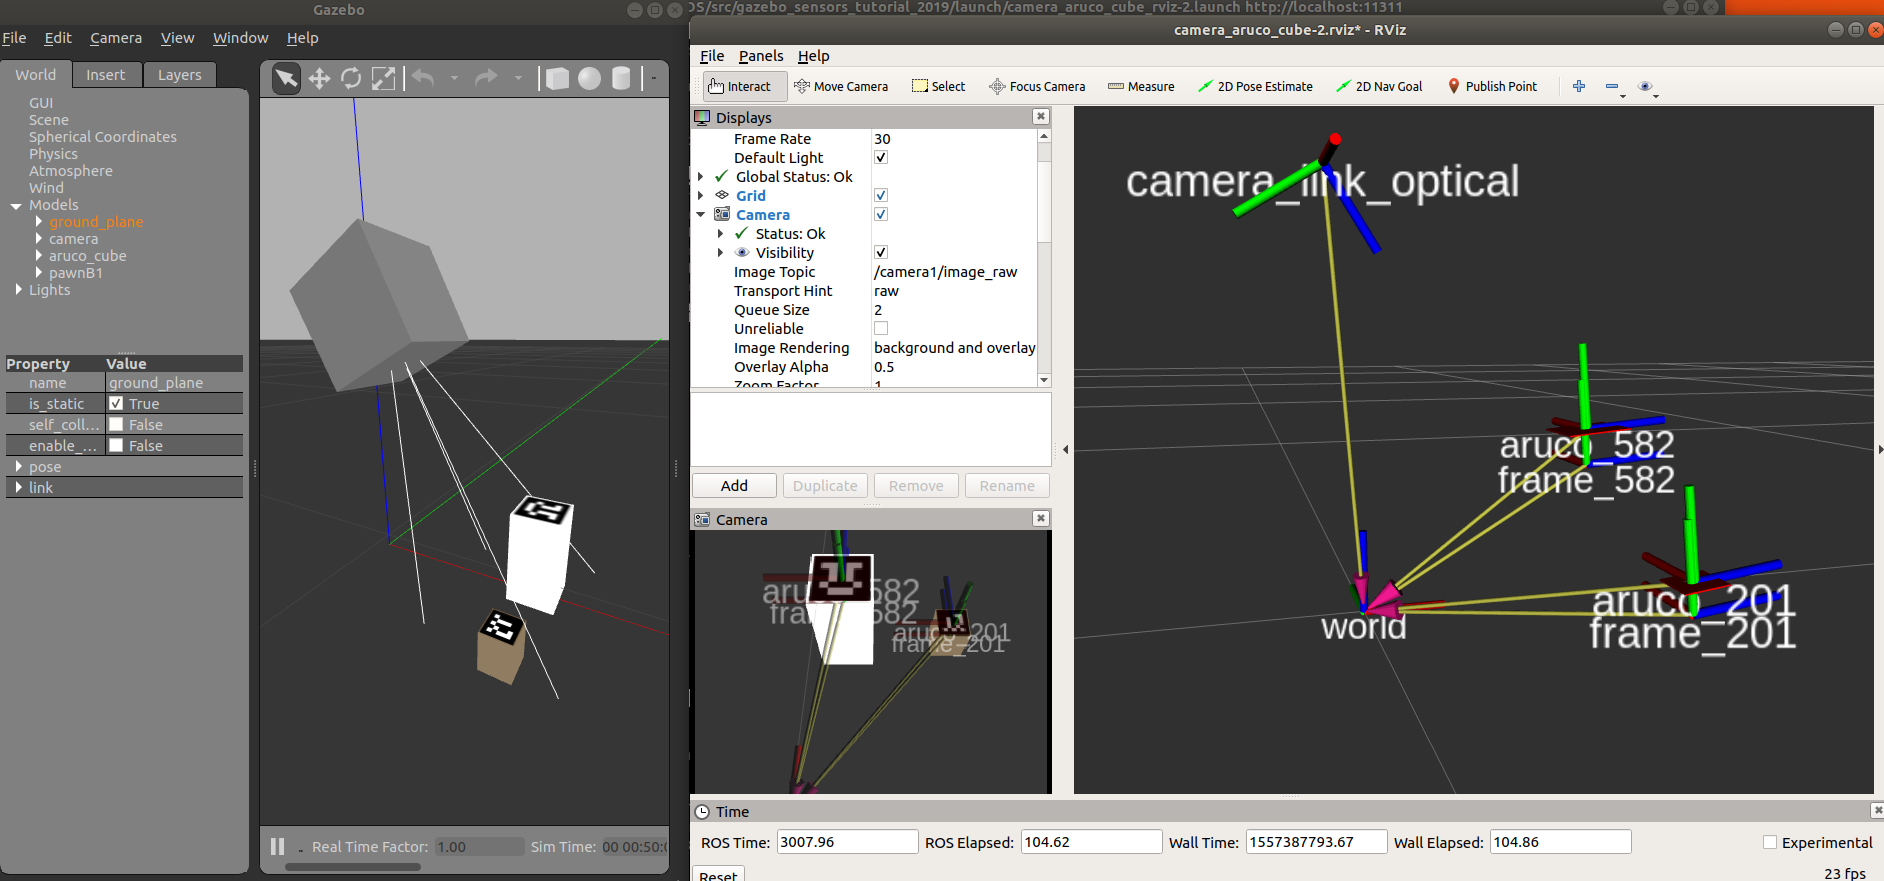
Exercise
Move the pose of the cubes using the gazebo GUI and check how the new poses are tracked in rviz.
You can take a look at the files of the gazebo_sensors_tutorial package to check that:
File launch/camera_gazebo2.launch runs gazebo and loads the camera2.world.
File worlds/camera2.world contains the camera-plugin model.
File models/camera-plugin/model.sdf contains the plugin libgazebo_ros_camera.so where the camera name, camera topics and frame are specified.
File launch/camera_aruco_cube_rviz-2.launch runs the image_proc node, includes the launch files for the aruco single nodes, and runs the aruco_frames_detection node.
File launch/aruco_single.launch.xml runs the node single of the aruco_ros package with the values of the arguments passed (or given as default).
File src/arcuo_frames_detection.cpp implements the node that subscribes to the poses of the aruco frames detected and publishes at the center of the cubes.
The aruco_ros node of type marker_publisher
If there are many markers to be detected all of the same size, a node of type marker_publisher should be run. The aruco_msgs/MarkerArray will contain the information of the detecte markers, but no tf are broadcasted. To do so, the package aruco_broadcater has a node of type aruco_broadcaster that broadcasts a tf of any marker detected by the marker_publisher node.
This is illustrated in the following example:
$ roslaunch gazebo_sensors_tutorial camera_gazebo2_cubes.launch
$ roslaunch gazebo_sensors_tutorial camera_aruco_cube_rviz-aruco_broadcaster.launch
The aruco_broadcaster node is configured with a yaml file with information regarding: a) which markers should be published; b) the frame w.r.t. the arucos are referred; c) the prefix of the tf that will be used, e.g. aruco_.
1 2 3 4 5 6 7 8 9 10 11 12 13 14 15 16 17 18 19 20 | # Yaml file with configutration of sensored setup
#
# markerFixList: contains the list of the arucos.
# if it is empty, publish all.
# camera_frame: contains the string that define
# the camera frame wrt the markers are referred.
# aruco_frame: name of the prefix _##
# where the new tf will be use.
# ex. of a list
#markerList: [100, 101, 106]
# publish all the markers found
markerList: []
# the frame w.r.t. the arucos are referred
camera_frame: camera_link_optical
# the prefix of the tf that will be used
aruco_frame: aruco
|
The RealSense camera
The Intel® RealSense™ Depth Camera D415 is a RGBD camera that generates the depth data with stereo vision technology that is optionally assisted by an infrared projector. The imaging system has the ability to synchronize with color stream. Detailed technical information can be found in the datasheet.

The realsense-ros package is an ROS Wrapper for the D400 series, the SR300 Camera and the T265 Tracking Module, i.e. this package will allow us to work with the D415 through ROS. For simulation purposes using Gazebo, the package includes an URDF file _d415.urdf.xacro that describes the D415 sensor with the plugins used.
In the package gazebo_sensors_tutorial this file has been modified by providing a xacro::macro that wraps the URDF model to make it configurable through parameters that allow to activate/deactivate the different cameras and to change the update rate. The modified file is robot/sensors/_d415.urdf.xacro.
The part related to the color camera plugin is the following:
1 2 3 4 5 6 7 8 9 10 11 12 13 14 15 16 17 18 19 20 21 22 23 24 25 26 27 28 29 30 31 32 33 34 35 36 37 38 39 40 41 | <xacro:if value="${flag_color}" >
<sensor name="${name}_rgb_sensor" type="camera">
<pose frame="${name}_color_optical_frame">0 0 0 0 0 0</pose>
<camera name="${name}_color">
<horizontal_fov>1.211258501</horizontal_fov><!--69.4 deg = 1.211258501 rad -->
<aspect_ratio>1.777777778</aspect_ratio><!-- 16:9-->
<image>
<width>1920</width>
<height>1080</height>
<format>RGB_INT8</format>
</image>
<clip>
<near>0.1</near>
<far>100</far>
</clip>
<noise>
<type>gaussian</type>
<mean>0.0</mean>
<stddev>0.007</stddev>
</noise>
</camera>
<always_on>1</always_on>
<update_rate>${updaterate}</update_rate>
<visualize>1</visualize>
<plugin name="${name}_color_controller" filename="libgazebo_ros_camera.so">
<alwaysOn>true</alwaysOn>
<updateRate>0.0</updateRate>
<cameraName>${name}/color/</cameraName>
<imageTopicName>image_raw</imageTopicName>
<cameraInfoTopicName>camera_info</cameraInfoTopicName>
<frameName>${name}_color_optical_frame</frameName>
<!--<hackBaseline>0.07</hackBaseline>-->
<hackBaseline>${d415_cam_depth_to_color_offset}</hackBaseline>
<distortionK1>0.0</distortionK1>
<distortionK2>0.0</distortionK2>
<distortionK3>0.0</distortionK3>
<distortionT1>0.0</distortionT1>
<distortionT2>0.0</distortionT2>
</plugin>
</sensor>
</xacro:if>
|
Exercise
Take a look at the whole file robot/sensors/_d415.urdf.xacro that describes the D415 sensor and at the file robot/camera_left.urdf.xacro that uses it and describes one of the cameras to be used in the following example.
The chess demo
An example has been prepared with two D415 cameras and a chessboard and two chess pieces labeled with ArUco makers. The world reference frame is located at the center of the chessboard.
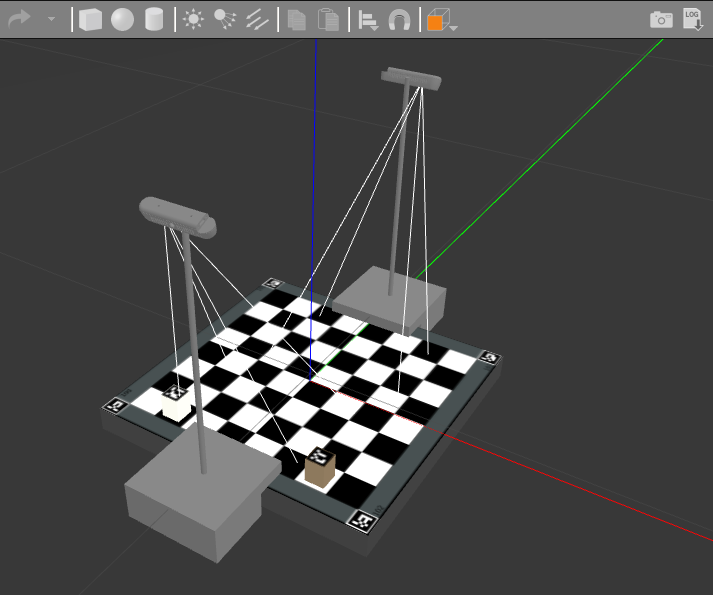
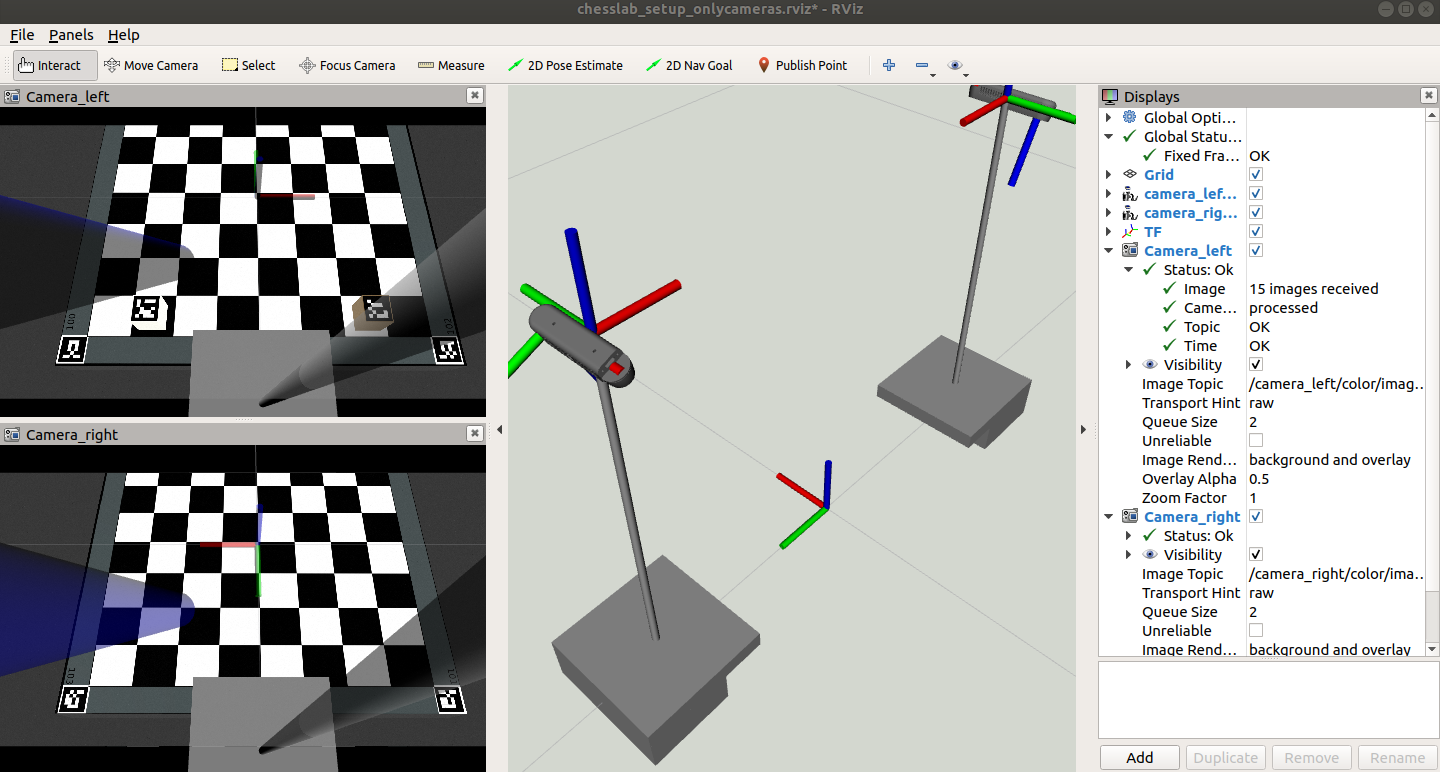
The following launch file opens both Gazebo and rviz:
$ roslaunch gazebo_sensors_tutorial cameras_chessboard.launch
Since the simulation of these sensors in Gazbo is computationally expensive, we can relay on the rosbag tool introduced in tutorial 6.
Cancel the simulation with Ctrl+C (be patient, it may take a while) and execute it again but with the recordimages argument set to true. This way a node record of the package rosbag will also be run to record during 12 s the raw images and the camera info of both cameras. The resulting rosbag file is called myrosbag.bag and stored in the ~/.ros folder.
$ roslaunch gazebo_sensors_tutorial cameras_chessboard.launch recordimages:=true
Now you can cancel again the simulation and use the recorded images (that could also come from the real D415 camera). The following launch file runs the play node of the rosbag package to play back the file myrosbag.bag, also runs the image_prog node and opens rviz to visualize the rectified images.
$ roslaunch gazebo_sensors_tutorial cameras_chessboard_rosbag.launch
Exercise
Use rqt to visualize the recorded images.
EXERCISE 5
To solve Exercise 5 you must modify the gazebo_sensors_tutorial package that you have cloned in your git-projects folder.
Recall to keep commiting the changes when coding the solution (do small commits with good commit messages!) and write a README.md file in the solution_exercise5 package explaining your solution (Markdown Cheat Sheet).
Exercise 5a
Modify the cameras_chessboard_rosbag.launch launch file by adding the required nodes to detect all the aruco markers found in the scene, including those in the chessboard corners. The new launch file should be called cameras_chessboard_rosbag_exercise_5a.launch.
Note 1: The size of all the marker sides is 0.026 m.
Note 2: A marker_publisher and an aruco_broadcaster nodes will be needed per camera. Be careful to consider the correct names of the cameras, their topics and frames. Also, a remap will be required for the aruco_broadcaster node.
Exercise 5b
In a file called perception.cpp, implement a node that offers a service called getpiecepose to retrieve the pose of an aruco marker using the tfListener presented in tutorial 5. Use the getpiecepose.srv file that defines the request (a string with the name of the tf, e.g. “aruco_100”) and the response (a geometry_msgs/TransformStamped). The new launch file should be called cameras_chessboard_rosbag_exercise_5b.launch.
SOLUTION EXERCISE 5
Download the zipped solution.
ROS plugins for other sensors
Multicamera: synchronizes multiple camera’s shutters such that they publish their images together. Typically used for stereo cameras, uses a very similar interface as the plain Camera plugin.
GPU Laser: simulates laser range sensor by broadcasting LaserScan message as described in sensor_msgs.
Laser: the non-GPU version of GPU Laser, but essentially uses the same code.
Block Laser: Description: provides grid style laser range scanner simulation (e.g. Velodyne).
F3D (Force Feedback Ground Truth): broadcasts external forces on a body in simulation over WrenchStamped message as described in geometry_msgs.
Force: ROS interface for applying Wrench (geometry_msgs) on a body in simulation.
IMU (GazeboRosImu): simulates IMU sensor. Measurements are computed by the ROS plugin, not by Gazebo.
Joint Pose Trajectory: listens to a jointtrajectoryaction and plays back the set of joint positions. Sets the set of joints to exact positions without regards to simulated physics and forces.
P3D (3D Position Interface for Ground Truth): broadcasts the inertial pose of any body in simulation via Odometry message as described in nav_msgs via ROS topic.
Projector: projects a static texture from a source outwards, such as used with the PR2’s original head camera sensor. See API documentation for more information.
Prosilica Camera: Simulates interfaces exposed by a ROS Prosilica Camera. Here’s an example URDF Xacro macro.
Bumper: provides contact feedback via ContactsState message.
Differential Drive: model plugin that provides a basic controller for differential drive robots in Gazebo. You need a well defined differential drive robot to use this plugin.
Skid Steering Drive: model plugin that provides a basic controller for skid steering drive robots in Gazebo (Pioneer 3AT for instance).
Video Plugin: visual plugin that displays a ROS image stream on an OGRE Texture inside gazebo. This plugin does not modify the texture of one of the existing link surfaces, but creates a new texture on top of it. The texture will be created on the XY plane, visible from the +Z side. The plugin requires a pixel size while constructing the texture, and will resize incoming ROS image messages to match if they are a different size.
Planar Move Plugin: model plugin that allows arbitrary objects (for instance cubes, spheres and cylinders) to be moved along a horizontal plane using a geometry_msgs/Twist message. The plugin works by imparting a linear velocity (XY) and an angular velocity (Z) to the object every cycle.
Template: an example c++ plugin template for anyone who wants to write their own plugin.