PRACTICAL P3: Advanced teleoperation with the UR3 robot
The task

Teleoperation mode
To correctly program the setpoints for it is desired to move the robot in a teleoperated way using two modes:
- Insertion Mode: This mode must allow the user to rotate about de x and y tool axes in order to correctly align the tool z axis with the hole axis, and once aligned to translate along that axis.
- Translation Mode: This mode must allow the user to translate along the world axes to set the tip of the tool at the next hole.


System implementation
The schema and the solution

The ROS packages
All available packages are stored in the following meta repository.
This repository contains the following submodules:
- beta_joystick (65b452f)
- session_two (Version_2019/2020-5-g3f3abe3)
- Universal_Robots_ROS_Driver (936ff8d)
- fmauch_universal_robot (1.1.5-201-g94623c8)
These packages have been installed in the robotic lab by cloning the repository:
$ git clone --recurse-submodules https://gitioc.upc.edu/practicalsessions/practical-session-p2.git
The Matlab node
Matlab can be integrated into ROS.
The file P2_template.m, shown below, is a template M-file that:
- Allows to change the teleoperation mode by subscribing to the /work_mode topic published by the joystick as a response of the buttons A and B in the front pane.
- Reads the values to be teleoperated by:
- Subscribing to the /twist_1_scale topic published by the joystick as a response of the motions along the x direction of the stick controlled by the thumb. The values published are -1, 0 or 1.
- Subscribing to the /twist_2_scale topic published by the joystick as a response of the motions along the y direction of the stick controlled by the thumb. The values published are -1, 0 or 1.
- Subscribing to the /twist_3_scale topic published by the joystick as a response to the buttons controlled by the index. The values published are -1, 0 or 1.
- Reads the joint positions by subscribing to the /joint_states topic published by the robot.
- Advertises the joint velocities by publishing to the /joint_group_vel_controller/command topic.


1 2 3 4 5 6 7 8 9 10 11 12 13 14 15 16 17 18 19 20 21 22 23 24 25 26 27 28 29 30 31 32 33 34 35 36 37 38 39 40 41 42 43 44 45 46 47 48 49 50 51 52 53 54 55 56 57 58 59 60 61 62 63 64 65 66 67 68 69 70 71 72 73 74 75 76 77 78 79 80 81 82 83 84 85 86 87 88 89 90 91 92 93 94 95 96 97 98 99 100 101 102 103 104 105 106 107 108 109 | %
rosshutdown;
clear;
rosinit;
% MasterHost will be your lab PC IP:
masterHost = 'HERE';
matlab_node = robotics.ros.Node('your_node', masterHost);
% Publishers
jointSpeedPub = robotics.ros.Publisher(matlab_node,'/joint_group_vel_controller/command','std_msgs/Float64MultiArray');
% Subscribers
jointStateSub = robotics.ros.Subscriber(matlab_node,'/joint_states');
twist1scaleSub = robotics.ros.Subscriber(matlab_node,'/twist_1_scale');
twist2scaleSub = robotics.ros.Subscriber(matlab_node,'/twist_2_scale');
twist3scaleSub = robotics.ros.Subscriber(matlab_node,'/twist_3_scale');
workModeSub = robotics.ros.Subscriber(matlab_node,'/work_mode');
% Create the SerialLink robot (UR3 model in Robotics toolbox):
% HERE
% Locate the tool frame at 15 cm in the z-directon:
% HERE
% Create the twists T1, T2, T3 in the adequate frame according to the motion
% required in each working mode.
% Workmode A:
% HERE
% Workmode B:
% HERE
% loop at (10hz)
r = robotics.Rate(50);
while robotics.ros.internal.Global.isNodeActive
% update position
if isvalid(jointStateSub)
jointStateMsg = receive(jointStateSub);
q(1) = jointStateMsg.Position(3);
q(2) = jointStateMsg.Position(2);
q(3) = jointStateMsg.Position(1);
q(4) = jointStateMsg.Position(4);
q(5) = jointStateMsg.Position(5);
q(6) = jointStateMsg.Position(6);
end
%display(q)
% Update jacobian
% HERE
% read work mode work_mode
if isvalid(workModeSub)
workModeMsg = receive(workModeSub);
work_mode = workModeMsg.Data;
% display(work_mode)
end
% read scales s1, s2, s3
if isvalid(twist1scaleSub)
slider1Msg = receive(twist1scaleSub);
s1 = slider1Msg.Data;
end
if isvalid(twist2scaleSub)
slider2Msg = receive(twist2scaleSub);
s2 = slider2Msg.Data;
end
if isvalid(twist3scaleSub)
slider3Msg = receive(twist3scaleSub);
s3 = slider3Msg.Data;
end
% Desired differential motion in the new frame
% [dx, dy, dz, rx, ry, rz]:
% HERE
% Associate yout twist with the joystick buttons (s1, s2, s3):
% HERE
% display(s1)
% display(s2)
% display(s3)
% Compute joint velocities:
% HERE
% Check not to sent q_dot with module greater than 1:
% HERE
% publish joint speeds
jointSpeedMsg = rosmessage('std_msgs/Float64MultiArray');
jointSpeedMsg.Data(1) = q_dot(1);
jointSpeedMsg.Data(2) = q_dot(2);
jointSpeedMsg.Data(3) = q_dot(3);
jointSpeedMsg.Data(4) = q_dot(4);
jointSpeedMsg.Data(5) = q_dot(5);
jointSpeedMsg.Data(6) = q_dot(6);
send(jointSpeedPub, jointSpeedMsg);
waitfor(r);
display(q_dot')
end
|
EXERCISE
Coding the script
Complete the template in order to:
- Create the SerialLink for the UR3 robot (using the mdl_ur3 function) and locate the tool frame at 15 cm in the z-direction.
- Update the Jacobian once the joint values have been received (see Geometric Jacobian).
- Create the twists T1, T2, T3 in the adequate frame according to the motion required in each working mode.
- Compute the desired differential motions in the base frame [dx, dy, dz, rx, ry, rz] (see Transforming Velocities between Coordinate Frames).

- Compute the joint velocities using the Jacobian. Scale each of the twists by e.g. 0.03, and check that the module of the joint velocity vector does not exceed 1.
Executing the nodes
To execute the whole system:
- Set the Joystick: check that the Bluetooth on the computer is turned on and that the Joystick is turned on. Press joystick’s buttons M and B at the same time, so the joystick works with the project (otherwise it works for the computer’s SO, turning volume up and down).


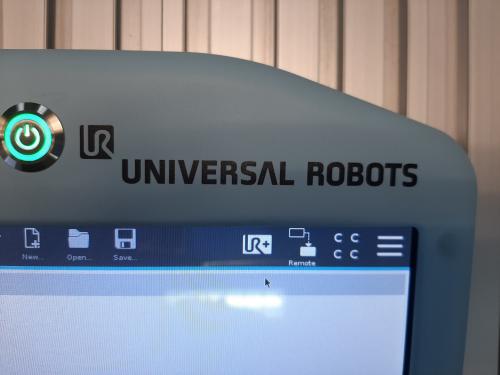
- Prepare the robot: Turn on the robot and place it manually at a configuration similar to the one shown in the first Figure using the freemode. In the e.series robot change the control mode in the teach pendant from local to remote, as shown next.

- Launch the application: Run the launch file that starts all the other nodes:
$ cd catkin_teleop
$ source devel/setup.bash
If you are using a CB3 robot:
$ roslaunch session_two ur3_bringup_custom.launch robot_ip:=10.5.20.XXIf you are using an eSeries robot:
$ roslaunch session_two ur3e_bringup_custom.launch robot_ip:=10.5.20.XXIn the robot_ip argument you must write the IP of your robot, depending on your work station:
WS-1: 10.5.20.80WS-2: 10.5.20.81WS-3: 10.5.20.79WS-4: 10.5.20.82WS-6: 10.5.20.84The nodes that control the robot and the joystick shall be running. You can test that the joystick is working: by moving the commands the information of what is being done is shown in the terminal.
Prepare your solution: Start Matlab and open the P2_template.m with your solution. Change the IP on masterHost (line 7) in order to coincide with your computer’s IP:
WS-1: 10.5.20.85WS-2: 10.5.20.86WS-3: 10.5.20.87WS-4: 10.5.20.88WS-6: 10.5.20.90
Run the script.
- Move the robot with the joystick, changing the mode to verify the correct functioning of both modes. Adjust the scales in the Matlab code if necessary.
- Enjoy.
Writing the report
Write a report describing the script and the performance of the execution.
Are singularities a problem? Why?